OpenZiti Zero Trust IoT Wi-Fi Gateway

Introduction
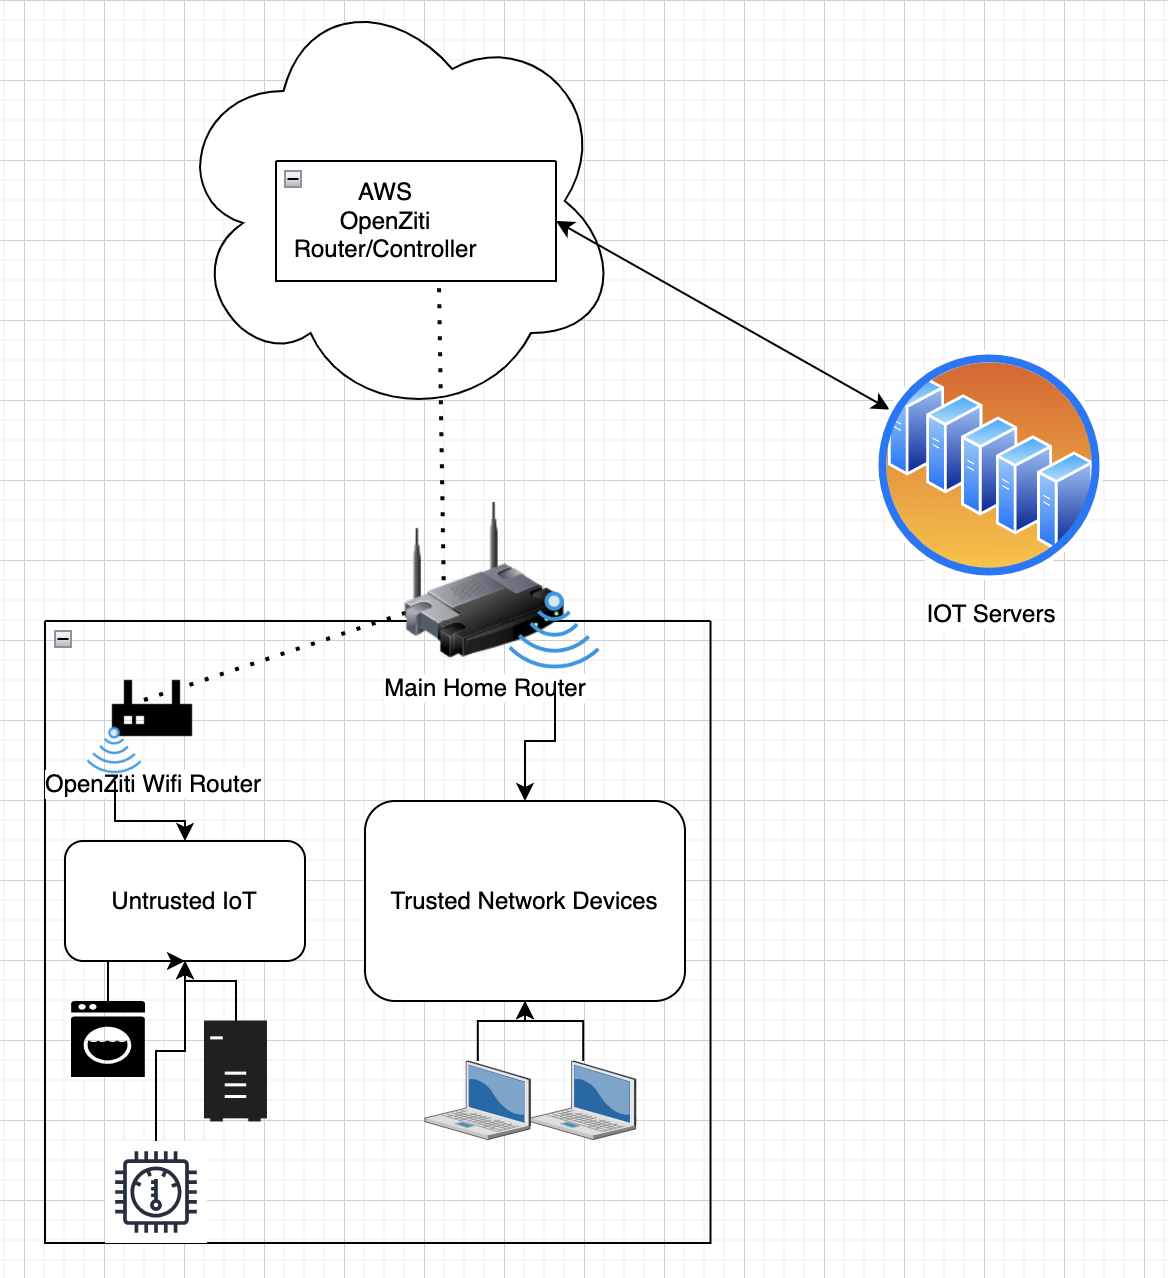
IoT devices are commonplace in most home networks and while they provide many useful features they can also open your network to vulnerabilities, especially if they are connected via Wi-Fi. For starters most legacy devices don’t support advanced features like wpa3 and 802.11w Wi-Fi protected management frames *e.g. Google Nest Gen 2 thermostats, Carrier Infinity touch series a/b and Ring security devices. A general recommendation is to only add IoT devices to your guest Wi-Fi network. While this helps to isolate the IoT devices from your home network it does not stop hackers from using that Wi-Fi network to perform illegal activities if it becomes compromised. In this article, we will show you how to set up an OpenZiti Zero trust Wi-Fi gateway using a Raspberry Pi 4 running Ubuntu Server 22.04(64 bit) that will restrict devices attached to the IoT Wi-Fi network to only the set of required IoT cloud servers. To do this we use a combination of OpenZiti DNS-based services which provide a form of DNAT and restrictive fire-walling which limits inbound traffic to only the OpenZiti DNS DNAT range. We will use the hostapd Linux package to provide Wi-Fi access point functionality.
*at the time of writing
Prerequisites:
Install Ubuntu 22.04 Server (64 bit) on a Raspberry Pi 4: https://www.raspberrypi.com/software. We strongly suggest that you set up SSH to only use public key authentication as described in this article
How to Set Up SSH Keys on Ubuntu 22.04 | DigitalOcean Note: in addition to settingPasswordAuthentication noin/etc/ssh/sshd_configyou will also need to set it in/etc/ssh/sshd_config.d/50-cloud-init.conf.If you do not already have an existing OpenZiti Network you can create a minimal setup in AWS following steps 1.1-1.3 here. Note you will want to assign an elastic IP to the VM before installing OpenZiti so the certificates created will remain valid after this node is restarted for any reason.
Create an identity for the Openziti wifi-gateway on the controller created in step 2. This step will create a jwt file in the directory where it's executed.
ssh to the controller VM public IP or DNS name and then input:
zitiLogin
ziti edge create identity wifi-gateway -o wifi-gateway.jwt
Create IoT Wi-Fi Router (updated)
ssh or log into the console of the Raspberry Pi 4
Follow the instructions for installing ziti-edge-tunnel(zet) on Ubuntu here. Use jwt file saved (wifi-gateway.jwt) previously.
Follow the instructions for installing zfw v0.7.0 or higher on arm64 here.
Select tunnel in the last step i.e
sudo make install ARGS=tunnel
Edit ebpf_config.json
sudo vi /opt/openziti/etc/ebpf_config.json
enter the following line and save:
{"InternalInterfaces": [{"Name": "eth0"}], "ExternalInterfaces": [{"Name": "wlan0", "PerInterfaceRules": false}]}
Enable zfw and restart ziti-edge-tunnel
sudo systemctl enable ziti-fw-init.service --now
sudo systemctl enable ziti-wrapper.service sudo systemctl restart ziti-edge-tunnel.service
Enter some user-defined firewall rules.
We need to enable 802.1x packets into the Wi-Fi interface (wlan0). Without the enable-eapol, the IoT devices will not be able to connect to the wlan0. Also, we need to enable DNS query (UDP 53)
sudo vi /opt/openziti/bin/user/user_rules.sh
sample /opt/openziti/bin/user/user_rules.sh content
#!/bin/bash
/usr/sbin/zfw --disable-ssh wlan0 #disables ssh passthrough
/usr/sbin/zfw --enable-eapol wlan0 #enables 802.1x passthrough
sudo chmod 700 /opt/openziti/bin/user/user_rules.sh
sudo systemctl restart ziti-edge-tunnel
Verify that zfw is running on the wlan0 interface
sudo zfw -L -E
Output:
wlan0: 5
--------------------------
icmp echo               :0
verbose                 :0
ssh disable             :1
per interface           :0
tc ingress filter       :1
tc egress filter        :1
tun mode intercept      :1
vrrp enable             :0
eapol enable            :1
ddos filtering          :0
--------------------------
Edit netplan to setup ip address/subnet for wlan0 interface
sudo vi /etc/netplan/50-cloud-init.yaml
sample /etc/netplan/50-cloud-init.yaml content:
network:
    ethernets:
        eth0:
            dhcp4: true
            optional: true
        wlan0:
            addresses:
            - 10.1.1.1/24
    version: 2
Save the new netplan parameters
sudo netplan generate
Apply new netplan
sudo netplan apply
Install and enable isc-dhcp-server
sudo apt install isc-dhcp-server sudo mv /etc/dhcp/dhcpd.conf /etc/dhcp/dhcp.conf.bak sudo vi /etc/dhcp/dhcpd.conf
sample /etc/dhcp/dhcpd.conf content:
subnet 10.1.1.0 netmask 255.255.255.0 {
  range 10.1.1.100 10.1.1.254;
  option domain-name-servers 100.64.0.2;
  option subnet-mask 255.255.255.255;
  option routers 10.1.1.1;
  option broadcast-address 10.1.1.255;
  default-lease-time 43200;
  max-lease-time 86400;
  authoritative;
}
Note: 100.64.0.2 is the DNS server that OpenZiti defaults to assuming that
you have not changed the default DNS range from 100.64.0.0/10.
sudo systemctl enable isc-dhcp-server
Install and start hostapd
sudo apt install hostapd
sudo vi /etc/hostapd/hostapd.conf
sample /etc/hostapd/hostapd.conf content:
ctrl_interface=/var/run/hostapd
logger_syslog=-1
logger_syslog_level=0
country_code=US
interface=wlan0
ssid=iot-access
ap_isolate=1
hw_mode=g
channel=1
macaddr_acl=0
auth_algs=1
ignore_broadcast_ssid=0
wpa=2
wpa_strict_rekey=1
wpa_passphrase=******* #Replace ******* with the WiFi password you want to use for this network
wpa_key_mgmt=WPA-PSK
rsn_pairwise=CCMP
note: for additional hostapd options and their descriptions you can refer to /usr/share/doc/hostapd/examples/hostapd.conf. You will need to adjust based on the supported WiFi auth options of your IoT devices.
Start hostapd service
sudo systemctl unmask hostapd.service
sudo systemctl start hostapd.service
sudo systemctl start isc-dhcp-server`
Discover IoT Service Requirements:
At this point, you should be able to connect your Wi-Fi IoT devices to the Wi-Fi access point but we have not built any Openziti services yet.
Since we do not know what URLs we need to reach, we are going to use tcpdump to determine URLs for our example. This process will vary slightly depending on whether the device uses DNS or hardcoded IP addresses (most will use DNS). For brevity, we will only look at one destination. In reality, most IoT devices connect to more than one remote destination and use multiple destination ports/protocols i.e. 443/TCP, 8883/TCP, 123/UDP etc. Alternatively, if the device vendor publishes firewall port info you can also use that information to populate OpenZiti service configs as well.
We are going to use a NEST thermostat as an example for the following exercises.
Perform the following on the wifi-gateway
sudo tcpdump -i wlan0 port 53
Reboot the Nest Thermostat
Example output:
16:27:31.105359 IP 10.1.1.101.54491 > 100.64.0.2.domain: 15404+ A? logsink.devices.nest.com. (42)
16:27:35.046118 IP 10.1.1.101.54491 > 100.64.0.2.domain: 23833+ A? frontdoor.nest.com. (36)
16:28:07.132888 IP 10.1.1.101.54895 > 100.64.0.2.domain: 13745+ A? time.nest.com. (31)
16:28:13.449597 IP 10.1.1.101.51019 > 100.64.0.2.domain: 45964+ AAAA? clients3.google.com. (37)
Now we will add a service to OpenZiti that will both resolve the DNS name above and Intercept traffic sent to the resolved IP. We are going to use a wildcard DNS address *.nest.com and *.google.com for our service because this gives us the most flexibility as it will resolve for any host/subdomains under nest.com and google.com respectively. This is important since we are white-listing domain names and iot manufacturers may change host/subdomain over time but still use the same second-level domain in this case nest.
At this point we don't know what ports or protocols will be used so we will seed our service with tcp port 443(most IoT devices will probably use this port). If port 443 is not in use we can replace it with the ports we find in the next tcpdump trace we take. Another option would be to add all ports UDP/TCP and then pare back after tracing i.e. 1-65535 but that's not the zero trust way :).
Add the service to OpenZiti
ssh into the controller vm created in prerequisite step 2
zitiLogin
Create the intercept.v1 config. We need to seed at least one port so we are going to add port 443. Note time.nest.com is likely NTP (UDP port 123) so we set that up separately in another service.
ziti edge create config iot-nest-intercept-config-tcp intercept.v1 '{"protocols": ["tcp"], "addresses": ["*.nest.com","*.google.com"], "portRanges": [{"low":443, "high": 443}]}'
Create host.v1 config
ziti edge create config iot-nest-host-config-tcp host.v1 '{"allowedPortRanges":[{"low": 443,"high": 443}], "allowedAddresses":["*.nest.com","*.google.com"], "forwardAddress":true,"forwardPort":true,"protocol":"tcp"}'
Create a service (with tag: nest-iot01-server)
ziti edge create service iot-nest-service-tcp -c iot-nest-intercept-config-tcp,iot-nest-host-config-tcp -a nest-iot01-server
Create an edge-router policy
ziti edge create edge-router-policy all-erp --edge-router-roles '#all' --identity-roles '#all' --semantic 'AnyOf'
Create a services-edge-router policy
ziti edge create service-edge-router-policy all-routers-serp --edge-router-roles '#all' --service-roles '#all' --semantic 'AnyOf'
Create a service Bind policy
Get the name of the edge-router created in prerequisite step 2
ziti edge list edge-routers
ziti edge create service-policy nest-bind Bind --identity-roles '@ec2-3-84-183-173-edge-router' --service-roles '#nest-iot01-server' --semantic 'AnyOf'
Create a OpenZiti service dial policy
ziti edge create service-policy nest-dial Dial --identity-roles '@wifi-gateway' --service-roles '#nest-iot01-server' --semantic 'AnyOf'
Check connectivity via tcpdump
At this point, we are looking to see if we see connectivity via TCP 443 or any other ports/protocols. We also look for any other DNS the IoT device (Nest) is going to reach.
sudo tcpdump -nNi wlan0 -v
Reboot Nest Thermostat again
Example output (new port discovery)
(Note we are using ebpf xdp to forward traffic from the ziti0 interface toward wlan0 which operates at a lower layer than tcpdump on egress so you will not see the return traffic with tcpdump for active sessions. You can alternatively enable verbose output on wlan0 for zfw viasudo zfw -v ziti0&&sudo zfw -M ziti0will show outbound traffic from ziti0 toward wlan0.)
16:40:32.365693 IP (tos 0x0, ttl 64, id 30637, offset 0, flags [DF], proto TCP (6), length 60)^M
    10.1.1.101.49777 > 100.64.0.13.11095: Flags [S], cksum 0x00f6 (correct), seq 4291868165, win 29200, options [mss 1460,sackOK,TS val 4294951336 ecr 0,nop,wscale 6], length 0^M
16:40:32.365693 IP (tos 0x0, ttl 64, id 30637, offset 0, flags [DF], proto TCP (6), length 60)^M
    10.1.1.101.49777 > 100.64.0.13.11095: Flags [S], cksum 0x00f6 (correct), seq 4291868165, win 29200, options [mss 1460,sackOK,TS val 4294951336 ecr 0,nop,wscale 6], length 0^M
16:40:32.378421 IP (tos 0x0, ttl 64, id 56631, offset 0, flags [DF], proto TCP (6), length 60)^M
    10.1.1.101.58357 > 100.64.0.13.443: Flags [S], cksum 0x87b1 (correct), seq 445914269, win 29200, options [mss 1460,sackOK,TS val 4294951338 ecr 0,nop,wscale 6], length 0^M
16:41:14.039751 IP (tos 0x0, ttl 64, id 47285, offset 0, flags [DF], proto UDP (17), length 66)^M
    100.64.0.2.53 > 10.1.1.101.45988: 58194- 1/0/1 squeakydoor.nest.com. A 100.64.0.14 (65)^M
16:40:33.460676 IP (tos 0x0, ttl 64, id 59775, offset 0, flags [DF], proto TCP (6), length 60)^M
    10.1.1.101.33943 > 100.64.0.14.443: Flags [S], cksum 0x4ad5 (correct), seq 2811571049, win 29200, options [mss 1460,sackOK,TS val 4294951446 ecr 0,nop,wscale 6], length 0^M
16:40:34.423395 IP (tos 0x0, ttl 254, id 14729, offset 0, flags [none], proto UDP (17), length 89)^M
    100.64.0.2.53 > 10.1.1.101.45988: 18020- 1/0/1 weather.nest.com. A 100.64.0.15 (61)^M
16:40:34.437242 IP (tos 0x0, ttl 64, id 30277, offset 0, flags [DF], proto TCP (6), length 60)^M
    10.1.1.101.59756 > 100.64.0.15.443: Flags [S], cksum 0x8ee1 (correct), seq 1971893298, win 29200, options [mss 1460,sackOK,TS val 4294951543 ecr 0,nop,wscale 6], length 0^M
16:40:35.420819 IP (tos 0x0, ttl 254, id 14758, offset 0, flags [none], proto UDP (17), length 97)^M
    100.64.0.2.53 > 10.1.1.101.45988: 44500- 1/0/1 logsink.devices.nest.com. A 100.64.0.16 (69)^M
16:40:35.426899 IP (tos 0x0, ttl 64, id 29036, offset 0, flags [DF], proto TCP (6), length 60)^M
    10.1.1.101.35782 > 100.64.0.16.443: Flags [S], cksum 0x9e81 (correct), seq 3282351031, win 29200, options [mss 1460,sackOK,TS val 4294951643 ecr 0,nop,wscale 6], length 0^M
16:41:07.844013 IP (tos 0x0, ttl 254, id 14876, offset 0, flags [none], proto UDP (17), length 86)^M
    100.64.0.2.53 > 10.1.1.101.56984: 11018- 1/0/1 time.nest.com. A 100.64.0.17 (58)^M
16:41:07.998713 IP (tos 0x0, ttl 254, id 14878, offset 0, flags [none], proto UDP (17), length 92)^M
    100.64.0.2.53 > 10.1.1.101.56609: 25412- 1/0/1 clients3.google.com. A 100.64.0.18 (64)^M
16:41:08.006201 IP (tos 0x0, ttl 64, id 34792, offset 0, flags [DF], proto TCP (6), length 60)^M
    10.1.1.101.58729 > 100.64.0.18.80: Flags [S], cksum 0xaac1 (correct), seq 768676994, win 29200, options [mss 1460,sackOK,TS val 4294939498 ecr 0,nop,wscale 6], length 0^M
16:41:15.213276 IP (tos 0x0, ttl 64, id 24325, offset 0, flags [DF], proto UDP (17), length 76)^M
    10.1.1.101.43410 > 100.64.0.17.123: NTPv4, Client, length 48^M
This output indicates that in addition to TCP port 443 we also need to add port 80 and 11095 as well as UDP port 123. So we need to add 80 and 11095 to our existing service configs. And we need to create a new config for the UDP connection.
We would then perform the following:
Connect to the controller
zitiLogin
Update invercept.V1 config
ziti edge update config iot-nest-intercept-config-tcp -d '{"protocols": ["tcp"], "addresses": ["*.nest.com","*.google.com"], "portRanges": [{"low":80, "high": 80},{"low":443, "high": 443}, {"low":11095, "high": 11095}]}'
Update host.v1 config
ziti edge update config iot-nest-host-config-tcp -d '{"allowedPortRanges":[{"low":80, "high": 80},{"low": 443,"high": 443}, {"low":11095, "high": 11095}], "allowedAddresses":["*.nest.com","*.google.com"], "forwardAddress":true,"forwardPort":true,"protocol":"tcp"}'
Create UDP config and service:
Create the intercept.v1 config for udp port 123
ziti edge create config iot-nest-intercept-config-udp intercept.v1 '{"protocols": ["udp"], "addresses": ["*.nest.com"], "portRanges": [{"low":123, "high": 123}]}'
Create host.v1 config
ziti edge create config iot-nest-host-config-udp host.v1 '{"allowedPortRanges":[{"low": 123,"high": 123}], "allowedAddresses":["*.nest.com"], "forwardAddress":true,"forwardPort":true,"protocol":"udp"}'
Create a udp service (with tag: nest-iot01-server)
ziti edge create service iot-nest-service-udp -c iot-nest-intercept-config-udp,iot-nest-host-config-udp -a nest-iot01-server
Continue to discover new protocols.
sudo tcpdump -nNi wlan0 -v
Example output (new DNS domain name discovery)
16:48:01.822923 IP (tos 0x0, ttl 64, id 49569, offset 0, flags [DF], proto UDP (17), length 84)
    10.1.1.101.36869 > 100.64.0.2.53: 48147+ A? 239.112.73.34.bc.googleusercontent.com. (56)
In this output, we discovered the nest device is trying to reach *.googleusercontent.com. So we need to add this domain to our existing TCP service configs.
Connect to the controller
zitiLogin
Update invercept.V1 config
ziti edge update config iot-nest-intercept-config-tcp -d '{"protocols": ["tcp"], "addresses": ["*.nest.com","*.google.com","*.googleusercontent.com"], "portRanges": [{"low": 80,"high": 80},{"low":443, "high": 443},{"low":11095, "high": 11095}]}'
Update host.v1 config
ziti edge update config iot-nest-host-config-tcp -d '{"allowedPortRanges":[{"low": 80,"high": 80},{"low": 443,"high": 443},{"low":11095, "high": 11095}], "allowedAddresses":["*.nest.com","*.google.com","*.googleusercontent.com"], "forwardAddress":true,"forwardPort":true,"protocol":"tcp"}'
Now check to see what port(s) are being used by 4.68.185.35.bc.googleusercontent.com
nslookup 4.68.185.35.bc.googleusercontent.com
nslookup  4.68.185.35.bc.googleusercontent.com
Server:		127.0.0.53
Address:	127.0.0.53#53

Non-authoritative answer:
Name:	4.68.185.35.bc.googleusercontent.com
Address: 100.64.0.22
sudo tcpdump -nNi wlan0 -v host 100.64.0.22
Here we see a new resolved ip 100.64.0.22 with TCP destination port 11095
16:48:06.858236 IP (tos 0x0, ttl 254, id 15176, offset 0, flags [none], proto TCP (6), length 40)
    100.64.0.22.11095 > 10.1.1.101.34576: Flags [R.], cksum 0xdb25 (correct), seq 2514414, ack 1381105441, win 768, length 0
Since the new address is connecting to port 11095 which is already included in the existing service configs we did not need to update the configs again.
Repeat discovery for each new IoT device type added to the wi-lan in series or parallel.
Conclusion:
In this article, we have shown how OpenZiti can be deployed on a Wi-Fi Raspberry Pi 4 access point to provide IoT device isolation and web filtering. We welcome any comments on this OpenZiti use case.