Securing Azure OpenAI Applications with OpenZiti

Scope
Once the initial release of ChatGPT happened at the end of 2022, a new wave of optimism and excitement started to sweep through Enterprises. Artificial Intelligence, more specifically generative AI, finally arrived in the mainstream. Company Executives pretty much everywhere in the world are trying to understand how it can be used to help their workforce and businesses be more productive and efficient. It was quickly realized that the data Enterprises own is very valuable and important. The large language models will help them greatly in their day-to-day decisions on whether to drive efficiency, lower costs on the supply chain or understand customer behavior and their consumption patterns to name a few. One thing is very clear, data security is of paramount importance not just at rest but in transit as well.
In this article, I will show how OpenZiti Overlay Network can secure the data forwarded between applications and users across the Internet. One will learn how two different personas within the same company (i.e. DevOps Engineering and Apps Consumers) can manage the infrastructure or just access the privately hosted Application through the same OpenZiti Overlay without opening any network ports on the service side and segmenting their access through different OpenZiti Services and Service/Access Policies. The architecture section will further highlight the differences before and after OpenZiti. We all know a diagram is worth 10,000 words.
Microsoft has been putting out various examples to educate potential users on how to deploy chat GPT-like applications in recent months. I found a couple of interesting ones that I wanted to use as a case study for OpenZti Overlay. These two examples are located in the following repos - container-apps-openai and aks-openai-terraform. Both used a private Azure OpenAI service offering on the backend with the Python-based Chat/Doc Applications deployed in the Azure Managed Container Service or AKS Cluster Service respectively. I forked the former repo as my base since I like the fact that showed two OpenAI applications. I modified it to host applications in the AKS Private Cluster as in the latter example instead of the Azure Managed Container Service.
One quick note before we get started. I used CloudZiti for this article, which is powered by OpenZiti Overlay Network but hosted and managed by NetFoundry. One can host the OpneZiti in his/her Private Virtual Cloud, and it is an excellent option as well. I wanted to focus on the service layer and access policies rather than on network deployment details. Links are provided to both Network Deployment Options later in this blog.
Architectures
Before OpenZiti Overlay
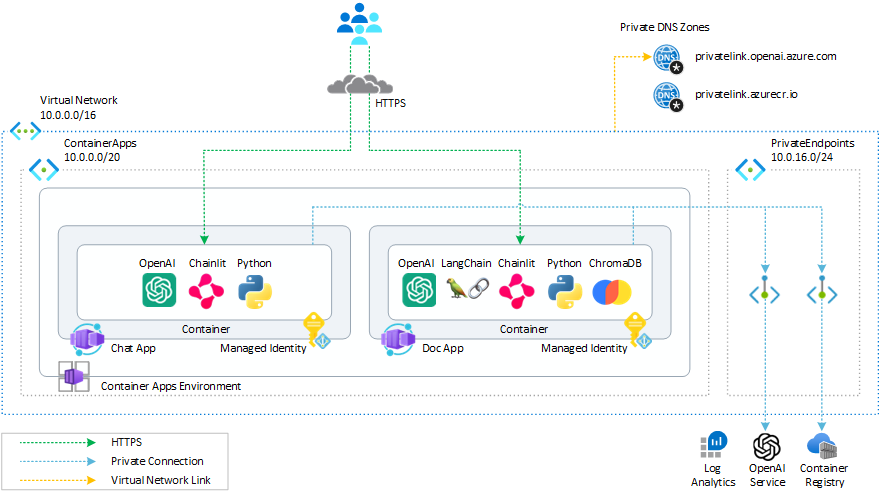
- container-apps-openai example
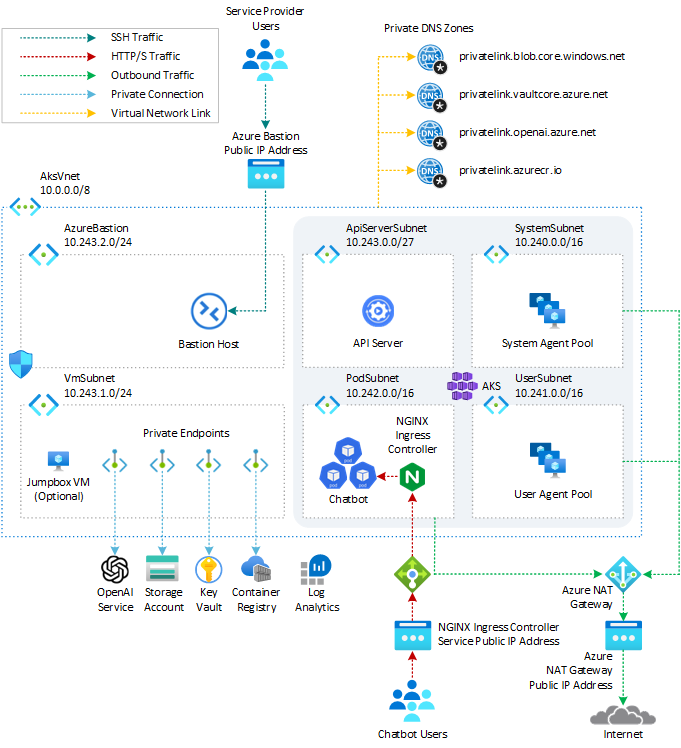
aks-openai-terraform example
With OpenZiti Overlay
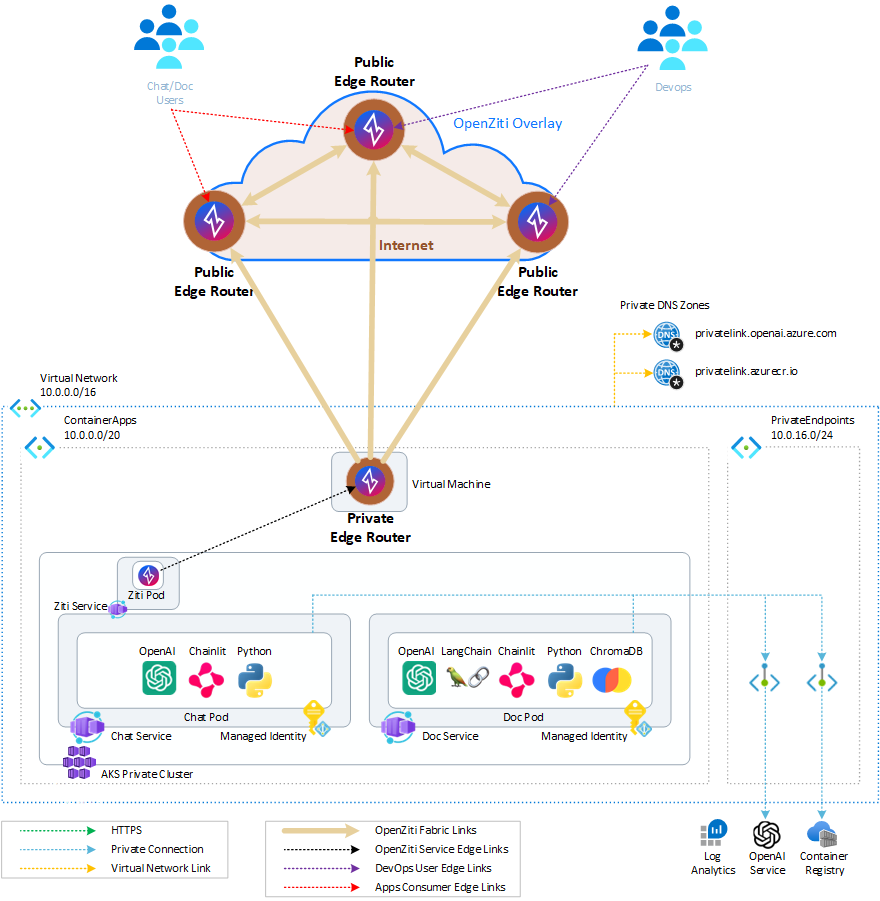
Option I
It depicts the access to the hosted applications through the Ziti Tunnel deployed in the cluster at a node level set to the hosted mode (similar to ingress controller-like access). In this scenario, one does not have to manage the TLS Certs, since the authentication and encryption are already built-in to the Overlay.
Option II
It depicts the access to the hosted applications through the Ziti Edge Router using the Private Ingress Nginx Proxy and TLS termination (i.e. Publicly signed Certs with Private IP Address). In this scenario, the ingress nginx manages the TLS termination and the Built-in End-to-End Overlay Encryption can be used for 2 layers of security or disabled.

Infrastructure Deployment
I cloned the repo container-apps-openai (a link to my forked repo and branch). Then, I updated the terraform plan to add the Private AKS Service to the deployment based on the details from the second example. Here are the details.
AKS Module
module "aks_identity" {
  source                       = "./modules/managed_identity"
  name                         = "${var.name_prefix}aksid"
  resource_group_name          = azurerm_resource_group.rg.name
  location                     = var.location
  openai_id                    = module.openai.id
  acr_id                       = module.container_registry.id
  tags                         = var.tags
}

module "aks" {
  source                                       = "Azure/aks/azurerm"
  version                                      = "7.3.2"
  cluster_name                                 = lower("${var.name_prefix}akscluster")
  prefix                                       = lower("${var.name_prefix}akscluster")
  resource_group_name                          = azurerm_resource_group.rg.name
  location                                     = var.location
  identity_ids                                 = [module.aks_identity.id]
  identity_type                                = "UserAssigned"
  oidc_issuer_enabled                          = true
  workload_identity_enabled                    = true
  vnet_subnet_id                               = module.virtual_network.subnet_ids[var.aca_subnet_name]
  net_profile_service_cidr                     = "10.0.20.0/22"
  net_profile_dns_service_ip                   = "10.0.20.2"
  rbac_aad                                     = false
  network_contributor_role_assigned_subnet_ids = {
    vnet_subnet = module.virtual_network.subnet_ids[var.aca_subnet_name]
  }
  private_cluster_enabled                      = true
  network_plugin                               = "azure"
  network_policy                               = "azure"
  os_disk_size_gb                              = 60
  sku_tier                                     = "Standard"
  depends_on                                   = [ azurerm_resource_group.rg ]
}
Edge Router
The important detail is to be able to manage the AKS Cluster after it is deployed. The kubectl access will be done through this router. The idea is that after the infrastructure plan is executed and completed successfully, the DevOps Users will have instance access through the Overlay Network to all the deployed infrastructure. There will be no need to have a bastion host deployed.
module "edge-router" {
  source                        = "Azure/compute/azurerm"
  version                       = "5.3.0"
  resource_group_name           = azurerm_resource_group.rg.name
  location                      = var.location
  vnet_subnet_id                = module.virtual_network.subnet_ids[var.aca_subnet_name]
  network_security_group        = {
    id = azurerm_network_security_group.edge_router_nsg.id
  }
  allocation_method              = "Static"
  public_ip_sku                  = "Standard"
  admin_username                 = "ziggy"
  ssh_key                        = var.ziti_router_ssh_pub
  custom_data                    = "#cloud-config\nruncmd:\n- [/opt/netfoundry/router-registration, ${var.ziti_router_reg_key}]"
  delete_os_disk_on_termination  = true
  enable_ip_forwarding           = true
  is_marketplace_image           = true
  vm_hostname                    = lower("${var.name_prefix}zitirouter")
  vm_os_offer                    = "ziti-edge-router"
  vm_os_publisher                = "netfoundryinc"
  vm_os_sku                      = "ziti-edge-router"
  vm_os_version                  = "latest"
  vm_size                        = "Standard_DS1_v2"
Extras - helm/kubernetes providers, kubectl config
resource "local_sensitive_file" "kubeconfig" {
  depends_on   = [module.aks]
  filename     = pathexpand("~/.kube/config")
  content      = module.aks.kube_config_raw
  file_permission = 0600
}
provider "kubernetes" {
  host                   = module.aks.host
  client_key             = base64decode(module.aks.client_key)
  client_certificate     = base64decode(module.aks.client_certificate)
  cluster_ca_certificate = base64decode(module.aks.cluster_ca_certificate)
}


provider "helm" {
  debug   = true
  kubernetes {
    host                   = module.aks.host
    client_key             = base64decode(module.aks.client_key)
    client_certificate     = base64decode(module.aks.client_certificate)
    cluster_ca_certificate = base64decode(module.aks.cluster_ca_certificate)
  }
}
Configuration Snippets for the Overlay Network
Before the terraform plan can be run, one needs to have the Overlay Network stood-up, services and access policies configured.
Get Free Cloud Ziti Network or Open Ziti Hosted in Your Cloud Account
Service configuration Option like wildcard domains allows DevOps Users to use one service to access multiple Azure Services and also to terminate/create the test environment multiple times to save on infrastructure cost if not used during evaluation without modifying the service every time.
Host.v1 service config
{
  "allowedAddresses": [
    "*.azurecr.io",
    "*.privatelink.blob.core.windows.net",
    "*.eastus.azmk8s.io",
    "*.privatelink.vaultcore.azure.net",
    "*.privatelink.openai.azure.net",
    "*.openai.azure.com",
    "*.openai.azure.net"
  ],
  "allowedPortRanges": [
    {
      "high": 443,
      "low": 443
    }
  ],
  "forwardAddress": true,
  "forwardPort": true,
  "protocol": "tcp"
}
Intercept.v1 service config
{
  "addresses": [
    "*.azurecr.io",
    "*.privatelink.blob.core.windows.net",
    "*.eastus.azmk8s.io",
    "*.privatelink.vaultcore.azure.net",
    "*.privatelink.openai.azure.net",
    "*.openai.azure.com",
    "*.openai.azure.net"
  ],
  "portRanges": [
    {
      "high": 443,
      "low": 443
    }
  ],
  "protocols": [
    "tcp"
  ]
}
Edge Router Policy
The important part is that the Ziti Identity’s group tag (#k8s) is assigned in identityRoles and Edge Router’s name tag (@aks-azure-router01) is assigned in edgeRouterRolesDisplay. One can also assign a group tag and have more routers that this endpoint can connect to, which don't have to be necessarily in the same resource group.
{
  "edgeRouterRoles": [
    "@RL2zF2SFY"
  ],
  "edgeRouterRolesDisplay": [
    {
      "name": "@aks-azure-router01",
      "role": "@RL2zF2SFY"
    }
  ],
  "identityRoles": [
    "#k8s"
  ],
  "identityRolesDisplay": [
    {
      "name": "#k8s",
      "role": "#k8s"
    }
  ],
  "isSystem": false,
  "name": "aks_policy",
  "semantic": "AnyOf"
}
ZDE Test Client
Test/DevOps Client for testing and setting up part of the infrastructure. I used the Windows clients. The installed WZDE can be downloaded from this repo.
Service Policy
Here is the service policy used that ties my client to the service created in the previous steps
{
  "identityRoles": [
     "#clients"
    ,
    "identityRolesDisplay": [
    {
      "name": "#clients",
      "role": "#clients"
     }

  ],
  "serviceRoles": [
    "#aks"
  ],
  "serviceRolesDisplay": [
    {
      "name": "#aks",
      "role": "#aks"
    }
  ],
  "type": "Dial"
}


# Relevent Service Configuration data
{
  "data": [
    {
      "configs": [
        "7aMiQw8wZY9D23dodHHKSQ",
        "e9lfsIHqqOAZv2hirv46p"
      ],
      "encryptionRequired": true,
      "name": "AKS-API-01",
      "permissions": [
        "Bind",
        "Dial"
      ],
      "roleAttributes": [
        "aks"
      ],
      "terminatorStrategy": "smartrouting"
    }
  ],
}
Plan Deployment
Once the service, all the policies, edge router, aks endpoint and Windows client are all configured on the CloudZiti Network, we are ready to install the Windows client (if not done so already) and run our terraform plan.
Update terraform.tfvars file. The reg key can be retrieved from the CloudZiti Console and make sure you have the SSH public key in your path under ~/.ssh/id_rsa.pub or change the path.
name_prefix         = "Dariusz"
location            = "eastus"
ziti_router_reg_key = "7MBY8KWYPU"
ziti_router_ssh_pub = "~/.ssh/id_rsa.pub"
Then, run this script to deploy the infrastructure
bash deploy.sh
OpenAI Apps Deployment
First, you need to build the app images, push them to the private registry in your RG, and finally deploy the apps.
cd into `src/` folder and modify `Blue` to your `prefix` in 00-variables.sh
bash 01-build-docker-images.sh
bash 03-push-docker-image.sh (note: may need to run
az account set --subscription <name or id>)Update the service account with your workload identity details and env settings if needed in the app deployment file. The workload identity name is added in the AKS Module section and is "${var.name_prefix}aksid"
apiVersion: v1
kind: ServiceAccount
metadata:
  annotations:
    azure.workload.identity/client-id: ${CLIENT_ID}
    azure.workload.identity/tenant-id: ${TENANT_ID}

# apply it
kubectl apply -f apps-deployment.yml

# pods status after deployment
kubectl get all -n chatbot
NAME                           READY   STATUS    RESTARTS   AGE
pod/chatapp-78895b949d-lng5l   1/1     Running   0          5m38s
pod/docapp-776c4d44f5-ddsxm    1/1     Running   0          5m38s

NAME              TYPE        CLUSTER-IP    EXTERNAL-IP   PORT(S)   AGE
service/chatapp   ClusterIP   10.0.23.7     <none>        80/TCP    5m39s
service/docapp    ClusterIP   10.0.22.202   <none>        80/TCP    5m38s

NAME                      READY   UP-TO-DATE   AVAILABLE   AGE
deployment.apps/chatapp   1/1     1            1           5m39s
deployment.apps/docapp    1/1     1            1           5m39s

NAME                                 DESIRED   CURRENT   READY   AGE
replicaset.apps/chatapp-78895b949d   1         1         1       5m39s
replicaset.apps/docapp-776c4d44f5    1         1         1       5m39s
Application Reachability
As stated in the scope, I am trying to show two ways. I will go through the service details for the End Users access now.
Ziti Endpoint in the cluster
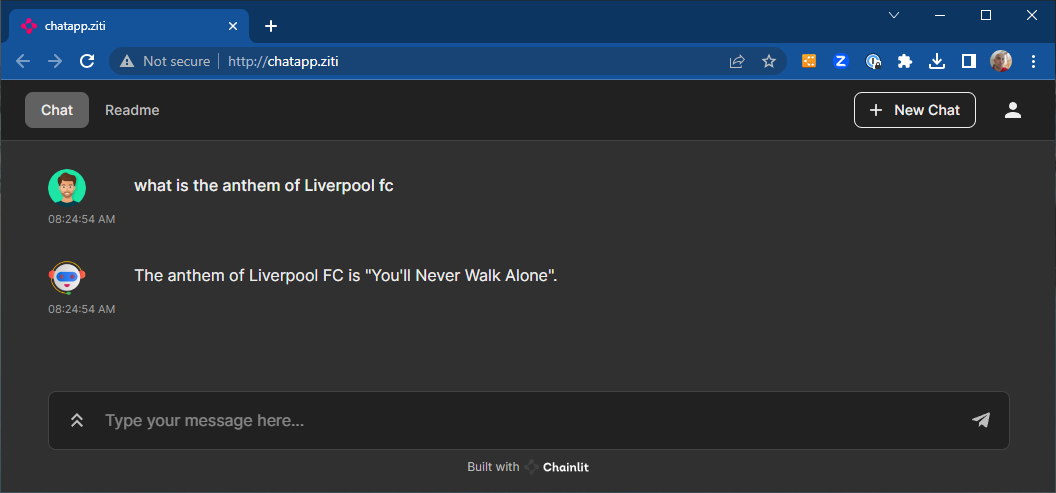
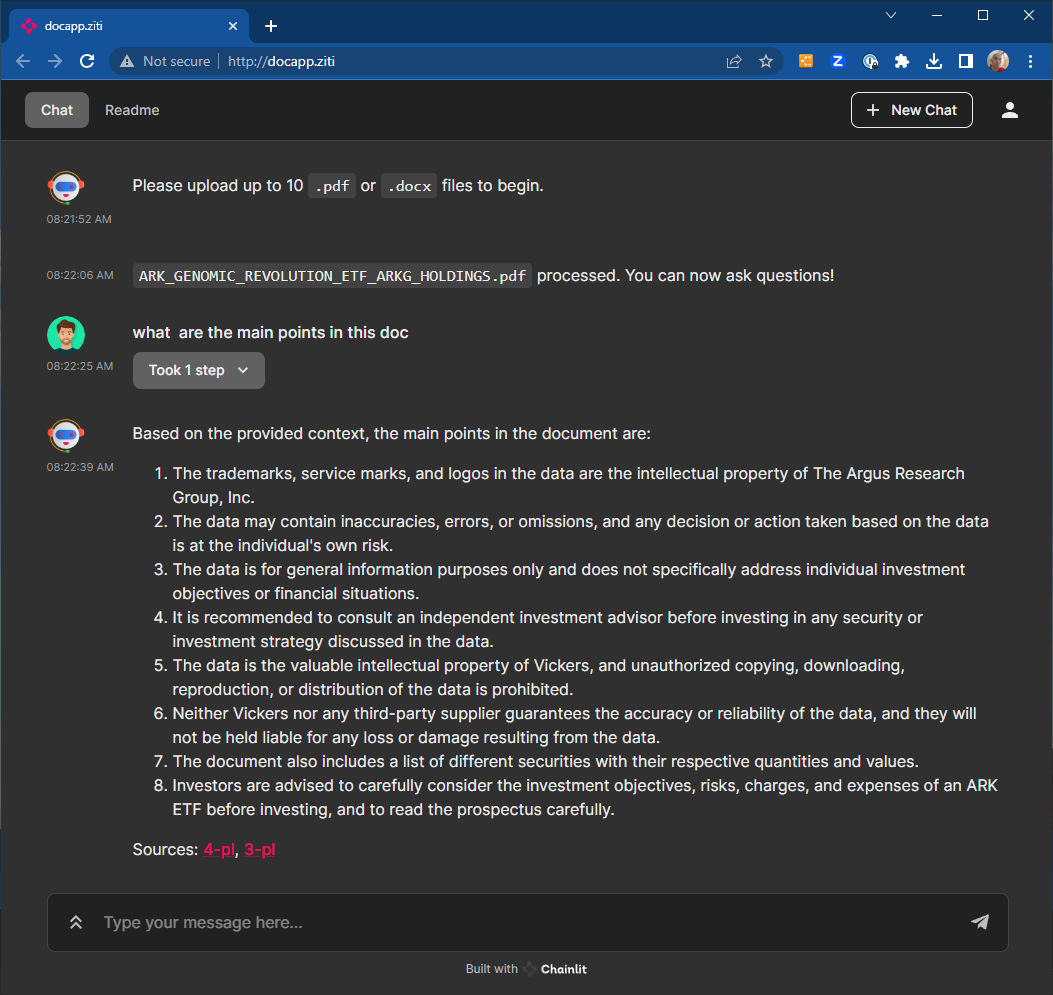
Deploying a Ziti Endpoint in the cluster and hosting HTTP service on it to reach the local cluster private DNS app names. You can ignore the padlock warning on your web browser since the end-to-end encryption is done by the Ziti Overlay Network. This simplifies deployment, where one does not have to create public certificates and deploy an ingress in the cluster.
Sample code to deploy Ziti Edge Tunnel along with the snippet of the service configuration details needed. First, you need to create an identity on the Ziti Network and download its identity's jwt. Link to OpenZiti CLI or Dockertized Cli
Deployment to the cluster
ziti edge enroll --jwt /tmp/k8s-zet-host.jwt --out /tmp/k8s-zet-host.json
or docker
docker run -v /tmp:/tmp openziti/ziti-cli edge enroll \
           --jwt /tmp/k8s-zet-host.jwt --out /tmp/k8s-zet-host.json
helm install k8s-zet-host openziti/ziti-host \
                --set-file zitiIdentity=/tmp/k8s-zet-host.json \
                --create-namespace --namespace ziti
kubectl get all -n ziti
NAME                                          READY   STATUS    RESTARTS   AGE
pod/k8s-zet-host-ziti-host-67cb9f8668-4lkql   1/1     Running   0          2m3s
NAME                                     READY   UP-TO-DATE   AVAILABLE   AGE
deployment.apps/k8s-zet-host-ziti-host   1/1     1            1           2m3s
NAME                                                DESIRED   CURRENT   READY   AGE
replicaset.apps/k8s-zet-host-ziti-host-67cb9f8668   1         1         1       2m3s
Service configuration details
Second app, just replace "docapp.ziti" and “docapp.chatbot.svc" respectively.
{
  "addresses": [
    "chatapp.ziti"
  ],
  "portRanges": [
    {
      "high": 80,
      "low": 80
    }
  ],
  "protocols": [
    "tcp"
  ]
}
{
  "address": "chatapp.chatbot.svc",
  "allowedPortRanges": [
    {
      "high": 80,
      "low": 80
    }
  ],
  "allowedProtocols": [
    "tcp"
  ],
  "forwardPort": true,
  "forwardProtocol": true
}
Both apps are now private and can be accessed through the overlay and all ports are closed. The HTTPS is not enabled between the web browser and apps, but the end-to-end encryption is provided by the overlay network.
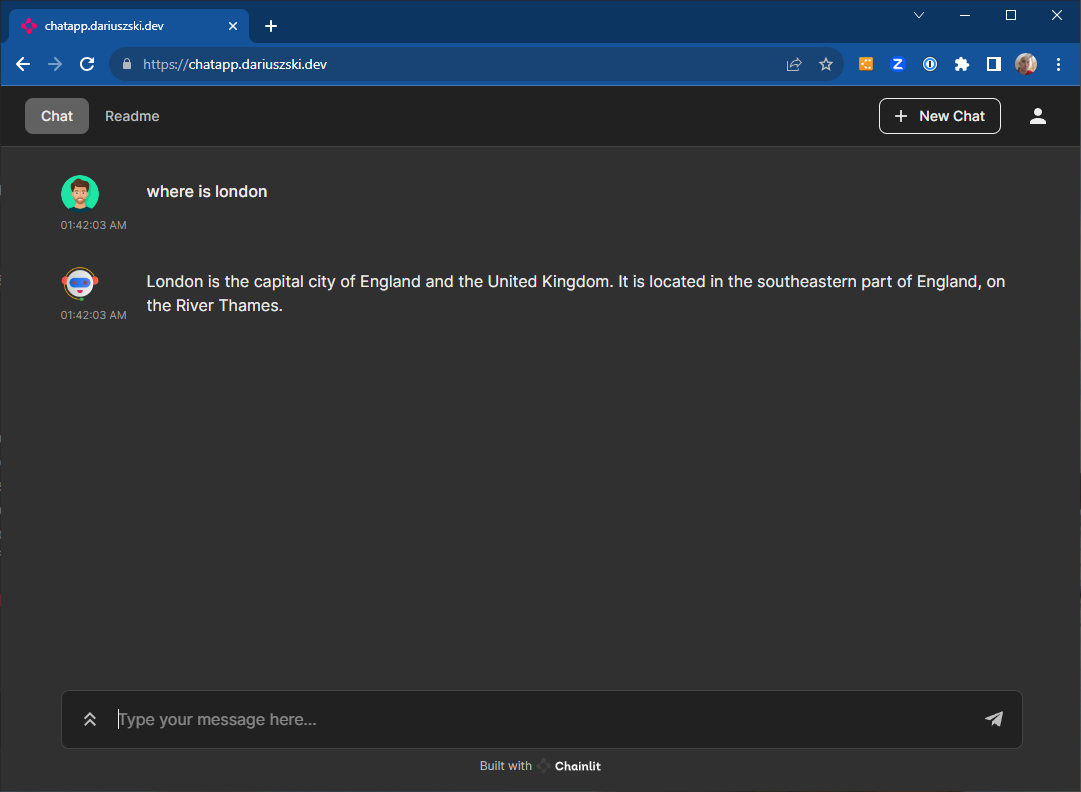
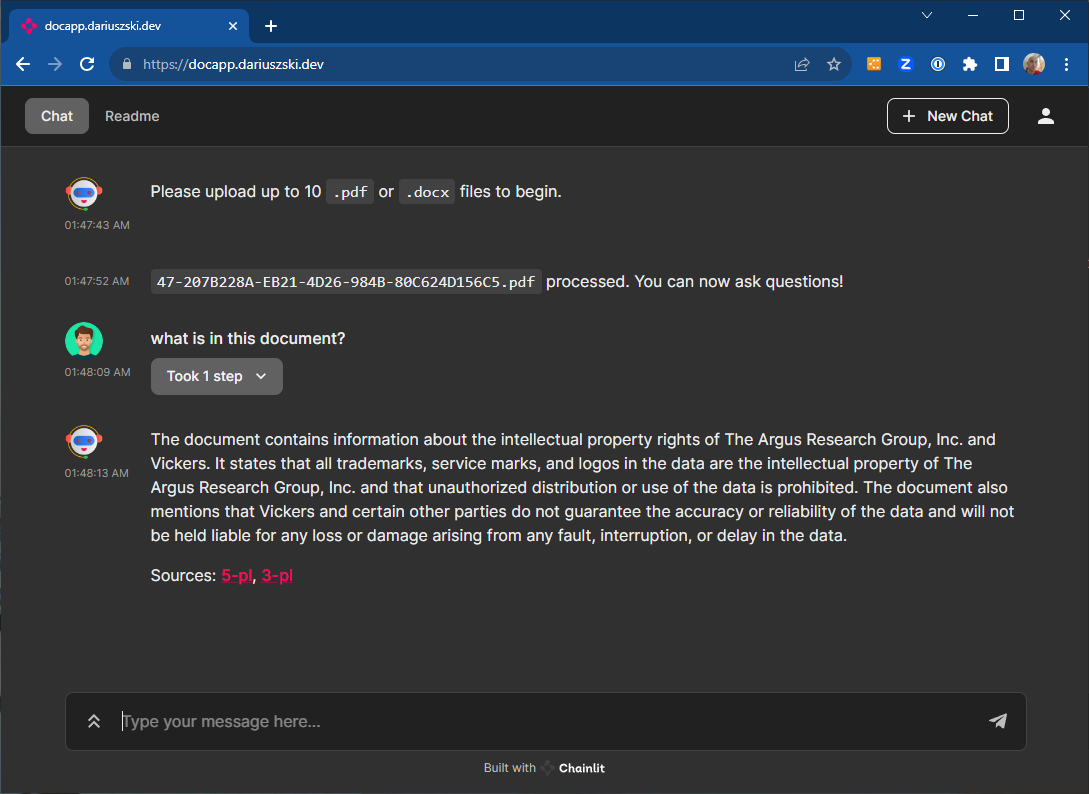
Cluster Private Ingress with Public Certs
One can create public certs that resolve to the cluster external private IP using these annotations:
helm install nginx-ingress ingress-nginx/ingress-nginx\
  --create-namespace \
  --namespace ingress \
  --set controller.nodeSelector."kubernetes\.io/os"=linux \
  --set controller.replicaCount=1 \
  --set defaultBackend.nodeSelector."kubernetes\.io/os"=linux \
  --set controller.service.annotations."service\.beta\.kubernetes\.io/azure-load-balancer-health-probe-request-path"=/healthz \
  --set controller.service.annotations."service\.beta\.kubernetes\.io/azure-load-balancer-internal"=true \
  --set controller.service.loadBalancerIP="10.0.0.122"
One Ingress for each of the apps:
apiVersion: networking.k8s.io/v1
kind: Ingress
metadata:
  name: chatapp-ingress
  namespace: chatbot
spec:
  ingressClassName: nginx
  tls:
  - hosts:
    - chatapp.dariuszski.dev
    secretName: chatapp
  rules:
  - host: "chatapp.dariuszski.dev"
    http:
      paths:
      - pathType: Prefix
        path: /
        backend:
          service:
            name: chatapp
            port:
              number: 80
---
apiVersion: networking.k8s.io/v1
kind: Ingress
metadata:
  name: docapp-ingress
  namespace: chatbot
spec:
  ingressClassName: nginx
  tls:
  - hosts:
    - docapp.dariuszski.dev
    secretName: docapp
  rules:
  - host: "docapp.dariuszski.dev"
    http:
      paths:
      - pathType: Prefix
        path: "/"
        backend:
          service:
            name: docapp
            port:
              number: 80
kubectl apply -f ingress.yml
ingress.networking.k8s.io/chatapp-ingress created
ingress.networking.k8s.io/docapp-ingress created
Create certs using the Let's Encrypt bot and upload them manually or use the cert-manager to automate the process. It was more convenient for me to create certs using Certbot and upload them manually to the secrets' store.
docker run \
  -v '/var/lib/letsencrypt:/var/lib/letsencrypt' \
  -v '/etc/letsencrypt:/etc/letsencrypt' \
  --cap-drop=all \
  ghcr.io/aaomidi/certbot-dns-google-domains:latest \
  certbot certonly \
  --authenticator 'dns-google-domains' \
  --dns-google-domains-credentials '/var/lib/letsencrypt/dns_google_domains_credentials.ini' \
  --server 'https://acme-v02.api.letsencrypt.org/directory' \
  -d 'chatapp.dariuszski.dev' -m ynwa.lfc@dariuszski.dev --agree-tos
kubectl create secret tls chatapp --cert "/etc/letsencrypt/live/chatapp.dariuszski.dev/cert.pem" --key  "/etc/letsencrypt/live/chatapp.dariuszski.dev/privkey.pem" -n chatbot
kubectl create secret tls docapp --cert "/etc/letsencrypt/live/docapp.dariuszski.dev/cert.pem" --key  "/etc/letsencrypt/live/docapp.dariuszski.dev/privkey.pem" -n chatbot
To show DNS lookup details.
$ nslookup chatapp.dariuszski.dev
Server:         127.0.0.53
Address:        127.0.0.53#53

Non-authoritative answer:
Name:   chatapp.dariuszski.dev
Address: 10.0.0.122

$ nslookup docapp.dariuszski.dev
Server:         127.0.0.53
Address:        127.0.0.53#53

Non-authoritative answer:
Name:   docapp.dariuszski.dev
Address: 10.0.0.122
Once the certs are loaded and the ingress controller set up, the web browser shows the padlock for both apps.
https://chatapp.dariuszski.dev/
https://docapp.dariuszski.dev/
Final Word
I went over a couple of options for accessing Applications deployed in AKS Clusters. There are technically two more. The third would be at the pod level, where Ziti Host can be deployed as a sidecar. The fourth is using Openziti Python SDK to embed the HTTP listener in both Python applications. Here is the link to the Ziti Python SDK source code and introduction blog. Probably good content to go over on the follow-up to this blog, unless there are brave souls - I mean developers - out there that can beat me to it. Challenge accepted?! By the way, I am not an application developer by trade. Surely you must have realized it by now, especially after I mentioned SDK as the last but certainly not least option :). Please let me know if you want me to dive into these other options in a future article in the comment section. Looking forward to your responses and feedback.