Securing a Dedicated Palworld Server For My Family with zrok

Grandfather, Father, Uncle, the 3.x version of Ed is grayer, stouter, and more medicated!
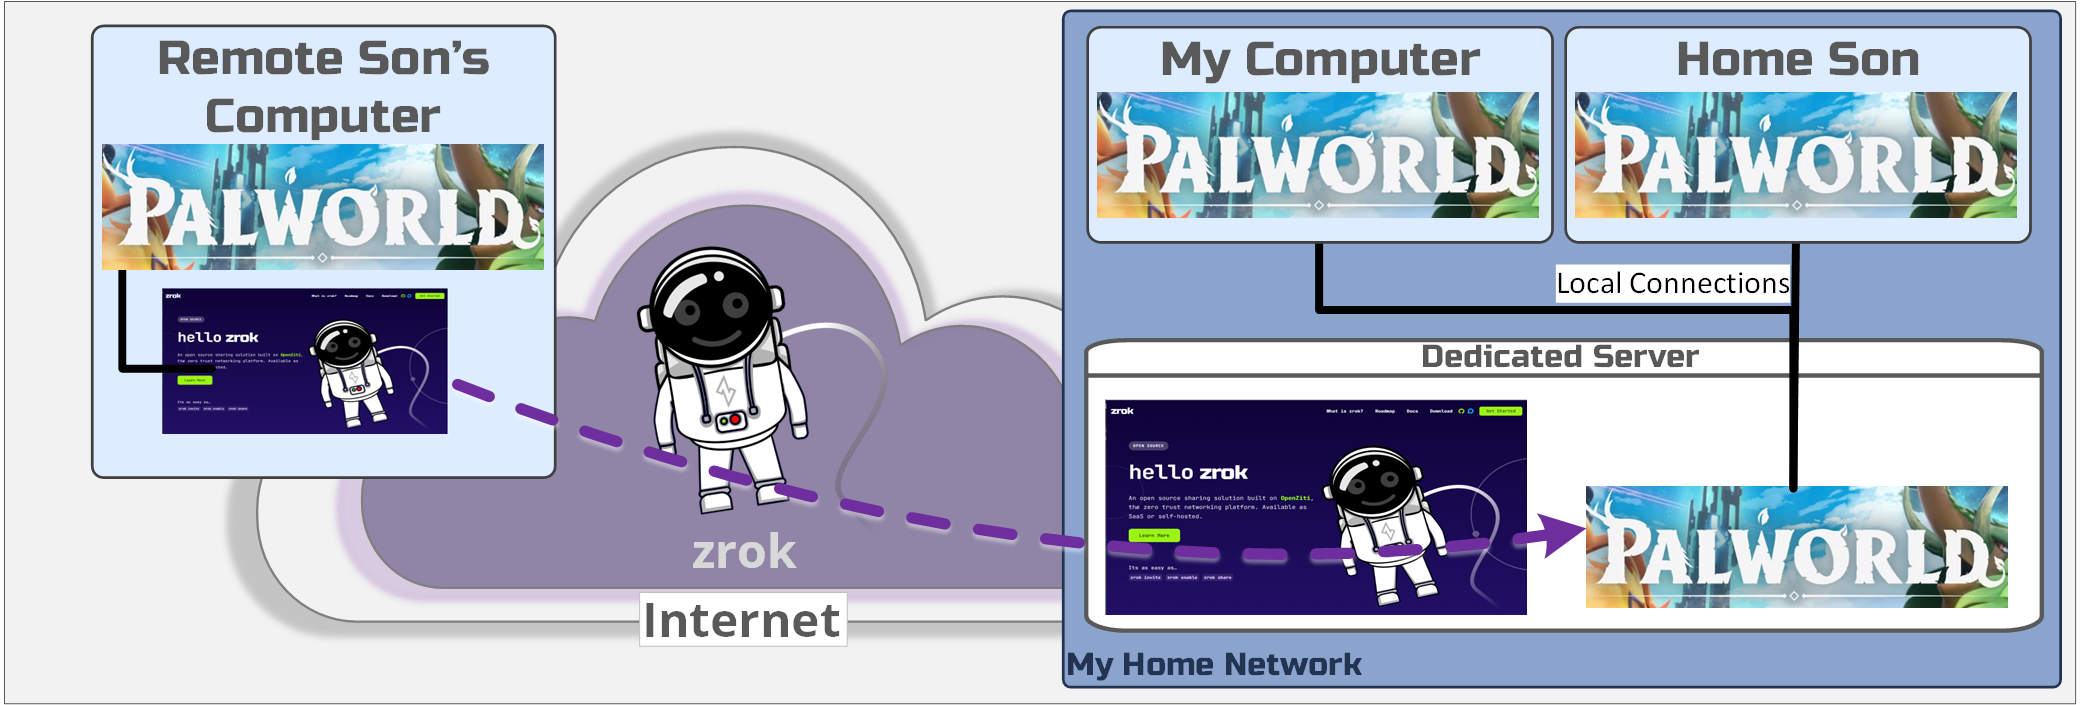
I like playing survival games, and my adult sons and I have been looking for a game we could play together. This weekend, we discovered Palworld, a new MMO available as an early release on Steam.
We wanted to play on a dedicated server. I recently purchased a gaming laptop, so I set up a dedicated server on the gaming PC I was no longer using. I won't get into setting up the dedicated server - I learned all about it by watching this YouTube video. You can also checkout the developer's docs on setting one up here
One of my sons lives at home and can access the game over our LAN. The other son has his own house, so I had to open a port over the internet for him to play with us. Ugh.
Enter zrok.
Securing Palworld
The company I work for, NetFoundry, created zrok, but I hadn't had a chance to use it in the wild yet. I read an article by Clint Dovholuk explaining how to use zrok to secure a Minecraft server - you can read that article here. I followed the steps as a zrok "newbie" to do the same for Palworld.
The instructions below are for setting up zrok and Palworld on a PC. zrok can be run in Windows/Mac/Linux, but Palworld is a PC game.
Install zrok
Download zrok from zrok.io and unzip the executable. I copied the executable file "zrok.exe" to my home directory.
Open a Windows Powershell on the machine where you plan to run the server and navigate to where you installed zrok.
At this point, you can follow the zrok Getting Started Guide:
~/zrok invite
Follow the rest of the guide to the point of enabling your zrok network:
~/zrok enable <your enable token>
- Repeat the process on all the computers needing secure game access. It's important to note that you need unique email addresses for each person.
Configure the Server Machine
In this tutorial we will be implementing a "reserved share" for our bridge.
You can use a
reservedshare to persist your share token across multiple runs of thezrok sharebridge. When you use areservedshare, the share token will not be deleted between multiple runs ofzrok share. - docs.zrok.io
- From a Powershell on the machine running the dedicated server:
zrok reserve private 127.0.0.1:8211 \
  --backend-mode udpTunnel \
  --unique-name mypalworldserver
By default, the game runs on port 8211. We set the --backend-mode to udpTunnel because the game communicates using UDP, not TCP. --unique-name makes it easier to reference the connection. The Getting Started Guide explains what it means to create a private connection and the meaning of "reserve."
- Next, we share the connection.
zrok share reserved mypalworldserver
Important: do not close the resulting terminal window!
That's it for the server machine.
Configure the Client Machine
In my case, the client machine was my son's gaming laptop.
- In the PowerShell you previously enabled, enter:
zrok access private mypalworldwerver --bind 127.0.0.1:8211
This command tells your laptop to access the server connection at 127.0.0.1:8211, which happens to be the default for Palworld.
Important: do not close the resulting terminal windows!
That leaves us with this: start the game, select Join Multiplayer, enter 127.0.0.1:8211, and connect! You are now playing over a secure network connection that no one can hijack.

Summary
In this tutorial, I tried to demonstrate how you can create a secure connection between a Palworld server and your gaming laptop, and you didn't need to forward any ports through to your home network!. To do this,
We installed and enabled zrok on the server and the client.
We created and shared a secure connection from the server that the game would recognize.
We accessed the connection from the client, in this case, the gaming laptop.
We pointed the game to a port on the local machine (not the server)
Of course, I only did this for the laptop playing the game over the internet - laptops playing over my in-house LAN were fine.
I hope you found this tutorial helpful and see how you might use zrok to secure other games that provide dedicated servers. If you have any questions, feel free to leave comments below.
If you find this useful please consider giving the zrok (and openziti, the software zrok uses to provide secure connectivity) a star on github. I know the developers would appreciate it.