Free Secure Access to NAS From Anywhere

The Problem
To put it plainly, I don't like opening up ports on my local firewall. However, I have a network attached storage (NAS) device that I want accessible from the internet so I have access from anywhere. So, how can I access my private network from anywhere without opening ports?
Backstory
(Skip if you don't care about me and my life)
I finally got around to using a NAS device (Synology DS220j to be exact) instead of fiddling with USB backup drives. It was an exciting time (I get overly excited about organization since I'm a naturally messy person) since I could now centralize my data storage and backups, I could create users, quotas, you know, all the stuff about which my wife could not care less.
Now, how could I make NAS even more exciting? I could access my network storage from anywhere or maybe even create a shared folder that I could use to share things with my family members (who don't live in the same house). But, alas, I'm not a fan of opening ports to the world, I am very critical in my trust of companies' ability to focus on security to the degree I would expect. If you want to read about at least one huge reason why I don't like opening ports or trusting companies, check out my other article, which talks about my IP camera that was seemingly taken control of by some "rando." So, I decided to simply restrict my usage to my local network, I'll go without global accessibility for now.
What Has Changed?
Ah, but wait, now I work for NetFoundry, which provides the world with free, open source, zero trust networking through what they call "OpenZiti." So I had a couple of options, I could use their free tier which is where they host the overlay network, and I just connect my services to their network. But as you will see, it's so easy to host my own overlay network, why not just do that? In fact, I already set up a hosted network on an Oracle instance that I created for accessing Home Assistant over the internet, you can see how I did that in this article.
Now, I know what you're thinking, "Why don't you just use a VPN?". Well, VPNs are great tools and will provide internet access to devices on my local network. However, VPNs don't do what I want and may require opening ports on my home network firewall. Of course, I can modify the firewall rules to limit access to specific IPs and ports, but I like the features of zero trust, the usage is essentially the same. However, zero trust implemented with my hosted network doesn't require modifying my local firewall, so I don't need to be concerned with ensuring that my firewall configuration is correctly set up; all the setup is in the network. That's where a zero trust network comes in, it doesn't require opening up any ports locally, and it will only provide authenticated users to access my NAS, even though I have many other things hosted on my network.
The current network
The way it stands now, I can only access my NAS from home.
So How'd You Do It?
I thought you'd never ask, implementing a self-hosted zero trust network is much easier than one might think. There's a pretty simple process, actually really simple with the use of "Express Install." The general process is as follows;
Acquire a VPC to host the controller (if you don't mind opening ports, you could host your own locally)
Expose the appropriate ports on that host for the overlay devices to communicate
Create a controller and Edge Router for the overlay network
Create an Edge Router on your home device (NAS in this case)
- This can be a router, tunnel, or "zitified" application
Create the appropriate service, configs, and policies so the network can communicate
Create an identity for those who you deem worthy of having access to your NAS
Acquire a VPC to host the controller
I used Oracle Cloud Infrastructure (OCI) as they have a free tier that is free, and you can't accidentally use any paid-for services without upgrading your account. You could use any VPC you want, though, and as mentioned, if you don't mind opening ports, you could host your own locally, but my goal was to not open local ports. I used a free tier Canonical Ubuntu image for my server.
Expose the appropriate ports
The controller host must have a few ports open for communication on the overlay network. For full functionality, open the following ports;
8441 - The Controller port (this allows you to use the controller API)
8442 - The Edge Router port
8443 - The Ziti Console port (optional)
6262 - For Router to Controller communication
10080 - For Router to Router communication
22 - This one may already be open, but you should restrict it to your home IP
Oracle has a little quirk that makes it less intuitive than other cloud providers. You not only have to create a "Security List," but you have to open up the local instance firewall as well. The security list is trivial but for a little help opening up the local firewall ports, check out the example below.
sudo firewall-cmd --zone=public --add-port=8441/tcp --permanent # ... repeat for the other four ports sudo systemctl restart firewalld
Create a Controller and Edge-Router
This step is easy as a one-dish ziti casserole, ssh into your intended host and run the express install for "host it anywhere". If the few steps were followed correctly, you've set up a Controller and Edge-Router on your host, and you're ready for the next step.
Create an Edge Router on your home device
You can create a private Edge Router hosted on the NAS, but the route I took, which is even easier, was to host a Ziti Tunnel which avoids the configuration setup for an Edge Router.
Create the identity in your controller, enroll that puppy, and you'll have all your network "devices" set up.
Create the Service, Configs, and Policies
Now I need five essential things for the configuration setup of our network. I'll need the service, of course, this is the "address" used to access the resource. I'll need two service configs; one host, and one intercept. I'll need two service policies; one bind, and one dial. The configs define the address of the service you're hosting and the address of the service you will be dialing on the OpenZiti Network. The service is the mechanism that links those configs together, and the service policies define who/what will have access to host, or connect to a service. The service policy has a nice feature in that you can give access based on attributes, so in my case, I can create identities for all my family members and give them all an attribute of berlhome.berlcloud.clients so they automatically have access to use my network storage.
Create an identity for those who you deem worthy
For now, I'm just creating one identity that I'll call geoff.phone, which will be used on my cell phone. That's one other nice feature of zero trust networks, enrollment can only take place once so that a user won't have access to your service from just anywhere; you'll have to be on the device that performed the enrollment.
Too wordy, just give me the code
Okay, I've been known to ramble, if you just want the code and want to work your way through it, here is what we call a "cheat sheet." It's just a collection of commands needed to get set up, but it's up to you to adjust them as needed for your situation.
# Create a user identity: ziti edge create identity user geoff.phone -o geoff.phone.jwt -a "berlhome.berlcloud.clients"
# Create the identity: ziti edge create identity device berlhome.berlcloud -a berlhome.berlcloud.servers -o berlhome.berlcloud.jwt ziti edge enroll berlhome.berlcloud.jwt
# Create the configs and service: ziti edge create config berlhome.berlcloud.hostv1 host.v1 '{"protocol":"tcp", "address":"localhost","port":'5000'}' ziti edge create config berlhome.berlcloud.interceptv1 intercept.v1 '{"protocols":["tcp"],"addresses":["berlhome.berlcloud.ziti"], "portRanges":[{"low":'5000', "high":'5000'}]}' ziti edge create service berlhome.berlcloud --configs "berlhome.berlcloud.hostv1,berlhome.berlcloud.interceptv1"
# Create the service policies: ziti edge create service-policy berlhome.berlcloud.bind Bind --service-roles '@berlhome.berlcloud' --identity-roles '#berlhome.berlcloud.servers' ziti edge create service-policy berlhome.berlcloud.dial Dial --service-roles '@berlhome.berlcloud' --identity-roles '#berlhome.berlcloud.clients'
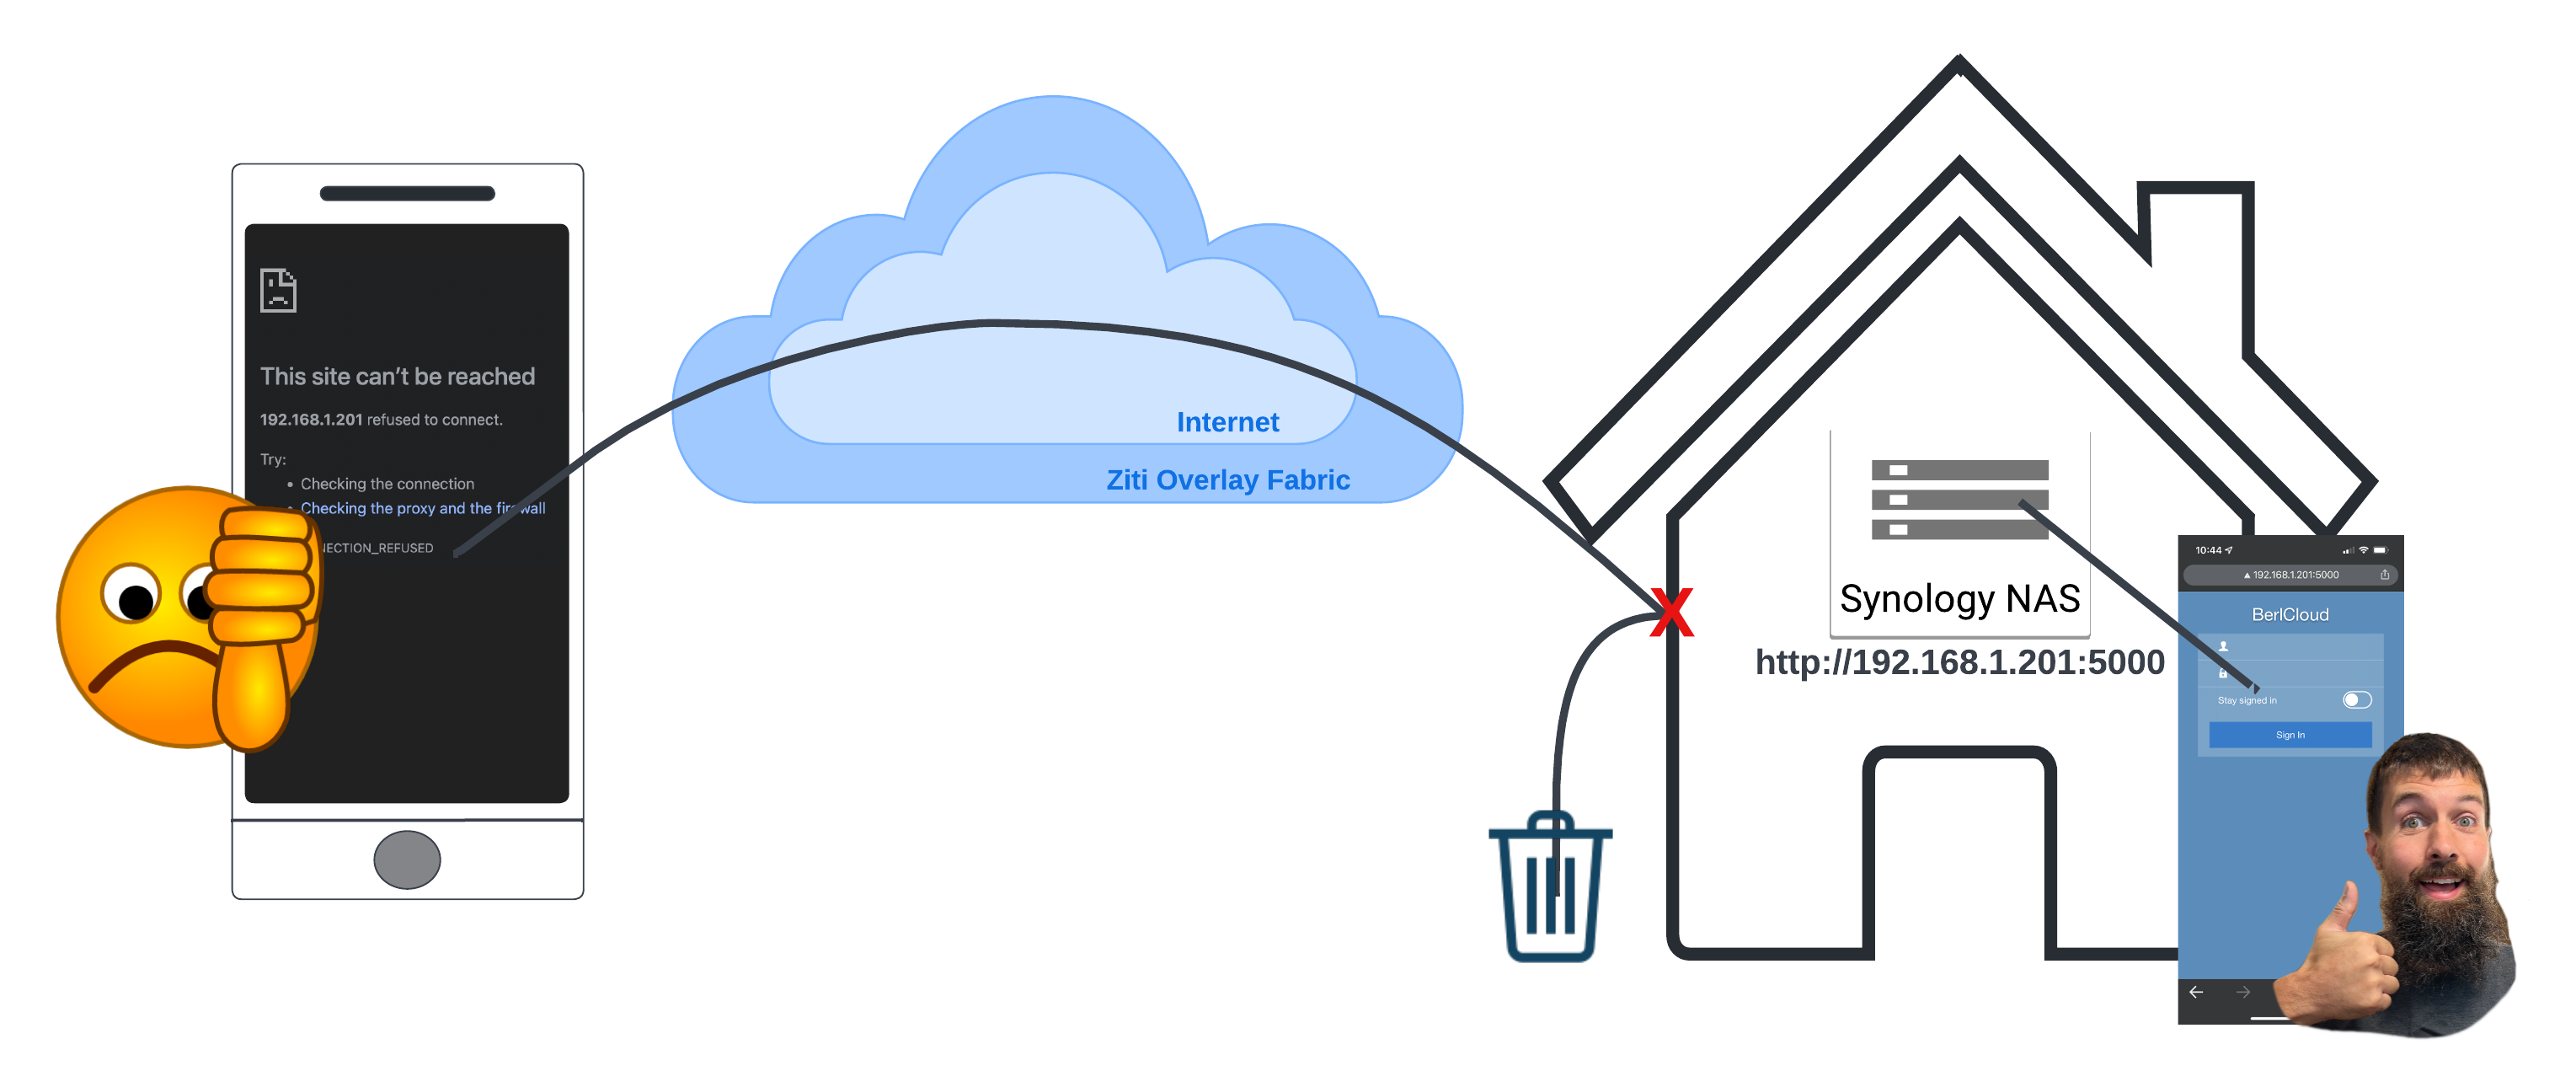
The New Network

Conclusion
With some pretty simple setup, I can now access my NAS from anywhere I have internet access. So now I have not only the security of the zero trust network but also the credentialed login to my "BerlCloud." The best part is I could gain access to the NAS to have it host the ziti tunnel, directing all NAS traffic directly to that device and only that device.