Tunneling Ingress to Kubernetes Workloads
The previous post showed how to use a zero trust overlay like Ziti for transferring files by zitifying scp. Next up in the list of zitifications is kubectl. Kubernetes is a container orchestration system. Its purpose is to deploy, scale, and manage the deployment containers. Containers are self-contained, pre-built images of software generally with a singular purpose. Developers often like using containers for various reasons. One major reason developers like containers is because it simplifies the deployment of the solutions they are developing. This is where Kubernetes starts to come into focus.
In this article we'll use a cloud provider to create a Kubernetes cluster to use. I'm using Oracle OKE in this article but there are numerous Kubernetes providers and any of them will work but clearly the commands I'm running here are Oracle specific. Once created we will then access the cluster three ways:
Via the public Kubernetes API secured via mTLS. This is the default, out-of-the-box mechanism provided by Kubernetes.
Via a tunneling app. I run Windows, so I'll use the Ziti Desktop Edge for Windows.
Via a zitified
kubectl.
Here's where we'll get to see the power of a truly zitified application. We'll be able to access our cluster extremely securely using the Ziti overlay network without installing an additional agent. Once access to the cluster comes entirely from the Ziti Network, we will be able to turn public access to the Kubernetes management API off entirely!
About Kubernetes
If you aren't already familiar with Kubernetes then it's probably best for you to stop reading and learn a little about it first. Though this article only expects you to understand the most rudimentary of commands, it won't teach you enough about Kubernetes to understand the what's and why's. Lots of documentation on this topic already exist and are just a search away in your search engine of choice.
Kubernetes itself is not a container engine, it's an orchestrator. This means that Kubernetes knows how to interface with container engines to perform deployments and management of workloads on the behalf of operators. This provides people with a common abstraction to use when doing this management and deployment. Interacting with the Kubernetes API is made easy by using the command-line tool: kubectl.
kubectl provides numerous commands and utilities to interact with your Kubernetes cluster. It does this by creating REST requests to a well-known endpoint. This endpoint is a highly-valuable target as it is the entry-point to the cluster. Plenty of blogs exist already on the internet addressing how to secure this endpoint but in this post we'll take it one step further than ever before by removing the Kubernetes control plane from the internet entirely. Following that we will even go one step further by replacing the existing kubectl command with a zero-trust implementation leveraging the ziti golang sdk.
If you'd prefer to watch a video that goes over the same content contained in the rest of this article you can go ahead and click here to watch.
Setup
Below is an overview of the Ziti Network I created for this article. On the left you can see that the client, my computer, runs Windows 10. Inside Windows 10 I run linux and bash using Ubuntu via Windows Subsystem For Linux (WSL). If you run Windows and don't have WSL installed I would encourage you to install and learn it! In my bash shell I have downloaded the linux version of kubectl created by combining the Ziti Golang SDK into it. You can grab it from this link if you like or go check out the code on GitHub and build it yourself!

Solution Overview

Basic Ziti Setup
To accomplish our stated goals, we will need not only an existing Ziti Network but we'll also have to configure that network accordingly. Here's a list of the components necessary to deliver Kubernetes with our zero-trust network:
A configuration for the
Bindside of the service. This informs the identity within Kubernetes where to send traffic and how.A configuration for the
Dialside of the service. This is strictly only necessary for tunneling apps. In this example, for the Ziti Desktop Edge for Windows and specifies what host and port will be intercepted on the machine running the stockkubectl. for Windows.The service itself which ties our polices mentioned above together.
A
Bindservice-policy which specifies which identities are allowed to act as a "host" for the service (meaning an identity to send traffic to which knows where and how to offload that traffic). In our example this will be theziti-edge-tunnelrunning in a Kubernetes pod.A
Dialservice-policy which specifies the identities allowed to access the service. This will be the identity using
kubectl.Create two identities - one for the
Bindside of the service (deployed within the Kubernetes cluster) and one for theDialor client side.
Here are some example commands using the ziti cli which illustrate how to create these services. Some things of note worth mentioning. I'm setting a variable to make my configuration easier. I reuse these code blocks a lot and by extracting some variables it makes it easy for me to delete/recreate services. First I set the service_name
variable. I use this variable in all the names of the Ziti objects I create just to make it more clear and obvious if I have to look back at my configuration again.
Since I'm going to be accessing my Kubernetes API which I've deployed using the Oracle cloud I chose to use k8s.oci
as my service name. When deployed by a cloud provider, the Kubernetes API is generated or updated with numerous SANS and IP address I can choose from to represent the Dial side which will be intercepted by the Ziti Desktop Edge for Windows. The Oracle cloud console informs me that the private IP of 10.0.0.6 was assigned to my cluster when I click on the 'Access Cluster' button which is why I chose to use that value below. I could have choosen to use any of the DNS names provided by OKE. There are at least five I could choose from, all visible as SANS on the cert that the server returns: kubernetes, kubernetes.default, kubernetes.default.svc, kubernetes.default.svc.cluster
, kubernetes.default.svc.cluster.local. I chose the IP since it's pretty obvious that it's an internal IP, not on my local network. Also worth pointing out is that I'm mapping the port as well, changing it from the port that the server provides, 6443, to the common HTTPS port of 443 for the local intercept. With zitified kubectl we don't even need these intercepts, but we'll keep it here so that we can use the unmodified kubectl as well. Finally, these commands are all executed inside a bash shell since I'm using WSL.
Example Ziti CLI commands
# the name of the service
service_name=k8s.oci

# the name of the identity you'd like to see on the kubectl client
the_user_identity="${service_name}.client"

# the name of the identity deployed into the kubernetes cluster
the_kubernetes_identity="${service_name}.private"

ziti edge create config "${service_name}-host.v1" host.v1 \
    '{"protocol":"tcp", "address":"10.0.0.6","port":6443 }'

ziti edge create config "${service_name}-client-config" intercept.v1 \
    '{"protocols":["tcp"],"addresses":["10.0.0.6","kubernetes"], "portRanges":[{"low":443, "high":443}]}'

ziti edge create service \
    "${service_name}" \
    --configs "${service_name}-client-config,${service_name}-host.v1"

ziti edge create service-policy "${service_name}-binding" Bind \
    --service-roles "@${service_name}" \
    --identity-roles "#${service_name}ServerEndpoints"

ziti edge create service-policy "${service_name}-dialing" Dial \
    --service-roles "@${service_name}" \
    --identity-roles "#${service_name}ClientEndpoints"

ziti edge create identity device "${the_kubernetes_identity}" \
    -a "${service_name}ServerEndpoints" \
    -o "${the_kubernetes_identity}.jwt"

ziti edge create identity device "${the_user_identity}" \
    -a "${service_name}ClientEndpoints" \
    -o "${the_user_identity}.jwt"
Kubernetes Config Files
Once we have established the pieces of the Ziti Network, we'll want to get the Kubernetes config files from OKE so that we can test access, make sure the cluster works etc. Oracle provides a CLI command which makes it pretty easy to get those config files called oci. As of this writing - the guide from Oracle is here. Once oci is installed and configured the Oracle cloud gives you very easy commands to run which will generate two files. One file will be for accessing the Kubernetes API through the public endpoint. The other will get you the file for private access. We're going to want both since we're on a journey here from "public API endpoint" to tunneling-app-based access, to the final stage of app-embedded zero-trust directly into kubeztl.
Getting the Kubernetes Config Files
Notice that we are changing the file location output by these commands and they are being output as two separate Kubernetes config files. If you prefer to merge them all into one big config file and change contexts - feel free. I left them as separate files here because it provides a very clear separation as to which config is being used or modified.
# Get this value directly from Oracle
oci_cluster_id="put-your-cluster-id-here"

oci ce cluster create-kubeconfig \
    --cluster-id ${oci_cluster_id} \
    --file /tmp/oci/config.oci.public \
    --region us-ashburn-1 \
    --token-version 2.0.0 \
    --kube-endpoint PUBLIC_ENDPOINT
chmod 600 /tmp/oci/config.oci.public

oci ce cluster create-kubeconfig \
    --cluster-id ${oci_cluster_id} \
    --file /tmp/oci/config.oci.private \
    --region us-ashburn-1 \
    --token-version 2.0.0 \
    --kube-endpoint PRIVATE_ENDPOINT
chmod 600 /tmp/oci/config.oci.private
Connecting the Pieces
At this point we should have all the pieces in place so that we can start putting them together to test the overall solution. In this section we'll access our public Kubernetes api to make sure it works. Then we'll install Ziti into the Kubernetes cluster and verify private access works. Finally we'll disable public access entirely and use the zitified kubeztl command to access the cluster with true, app-embedded zero-trust binary.
Testing the Public API
This step is very straight-forward for anyone who's used Kubernetes before. Issue the following commands, making sure the path is correct for your public Kubernetes config file, and verify Kubernetes works as expected.
export KUBECONFIG=/tmp/oci/config.oci.public
kubectl get pods -v6 --request-timeout=5s
I1019 13:57:31.910962    3211 loader.go:372] Config loaded from file:  /tmp/oci/config.oci.public
I1019 13:57:33.676047    3211 round_trippers.go:454] GET https://150.230.150.0:6443/api/v1/namespaces/default/pods?limit=500&timeout=5s 200 OK in 1752 milliseconds
NAME                                        READY   STATUS    RESTARTS   AGE
If your output looks something similar to the above (with or without the pods you expect to see) then great! That means your Kubernetes cluster is indeed up and running. Let's move on!
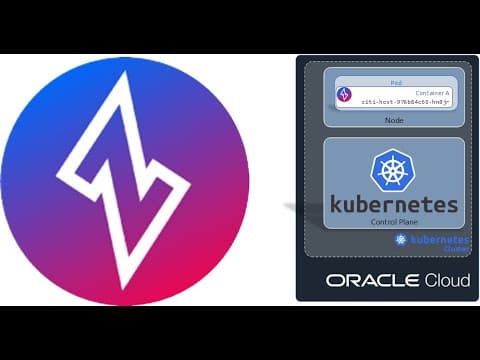
Deploying Ziti to Kubernetes
install the
helmCLI tool using this guideadd the OpenZiti Helm repo:
helm repo add openziti https://openziti.github.io/helm-charts/locate the jwt file for the Kubernetes identity. If you followed the steps above the file will be named:
"${the_kubernetes_identity}".jwt(make sure you replace the variable with the correct value)enroll the Kubernetes identity. This exchanges the temporary JWT for a permanent identity JSON file. Several Ziti CLIs have an
enrollcommand for this purpose. Here's one way to obtain the identity that doesn't require you to download a CLI if you already have Docker:# start with JWT file on Docker host in # /tmp/${the_kubernetes_identity}.jwt docker run --rm --volume /tmp:/mnt \ openziti/quickstart /openziti/ziti-bin/ziti edge enroll \ "/mnt/${the_kubernetes_identity}.jwt" # now you will have a new file # /tmp/${the_kubernetes_identity}.jsonuse the Kubernetes identity JSON file when you install the Helm chart:
 helm install ziti-host openziti/ziti-host \
     --set-file zitiIdentity="/tmp/${the_kubernetes_identity}.json"
Again, make sure you replace the variable name
Add/Enroll the Client Identity
Now consume the one time token (the jwt file) to enroll and create a client-side identity using the Ziti Desktop Edge for Windows (or MacOS or via the ziti-edge-tunnel if you prefer). Once you can see the identity in your tunneling app, you should be able to use the private kubernetes config file to access the same exact cluster. Remember though, we have mapped the port on the client side to use 443. That means you'll need to update your config file and change 6443 --> 443. Now when you run get pods you'll see the ziti-host pod deployed:
$ export KUBECONFIG=/tmp/oci/config.oci.private
$ kubectl get pods
NAME                        READY   STATUS    RESTARTS   AGE
ziti-host-976b84c66-kr4bc   1/1     Running   0          90m
The Big Finale - Zitified kubectl
If you have made it this far, you've seen us access the Kubernetes API via the public IP. We've even accessed it via the private IP (which btw - is pretty cool in my opinion!). Now we're going to download the zitified kubectl command, turn off the public IP and even turn off the locally running tunneling app and still access the API!
Disable the cluster's public IP address in OKE (go to the cluster in Oracle Cloud, click Edit and remove the public IP and click save)
Turn off the Ziti Desktop Edge for Windows
Download
kubeztl(you don't need to call the executablekubeztl- you can keep it namedkubectlif you want)curl -L -o kubeztl https://github.com/openziti-incubator/kubectl/releases/download/v0.0.4/kubectl-linux-amd64Use
kubeztlto get pods!./kubeztl get pods -c id.json -S k8s.oci NAME READY STATUS RESTARTS AGE ziti-host-976b84c66-kr4bc 1/1 Running 0 101mModifying KUBECONFIG
The kubeztl command has also been modified to allow you to add the service name and config file directly into the file itself. This is convenient since you will not need to supply the ziti identity file, nor will you need to specify which service to use. Modifying the file is straight-forward. Open the config file, find the context listed under the contexts root and add two rows as shown here.
contexts
- context:
    cluster: cluster-cjw4arxuolq
    user: user-cjw4arxuolq
    zConfig: /tmp/oci/k8s.id.json
    service: k8s.oci
Once done - you can now simply use the context the same way you have always - kubeztl get pods!!!
./kubeztl get pods
NAME                        READY   STATUS    RESTARTS   AGE
ziti-host-976b84c66-kr4bc   1/1     Running   0          114m
Conclusion
We've seen in this post how you can not only secure your Kubernetes API with the normal Kubernetes mechanisms. You can also take your Kubernetes API off the internet ENTIRELY. No need to deploy and maintain a special bastion node. Now by having a secure, zero-trust overlay in place you can safely and securely access your Kubernetes API without the fear of that public, high-value API getting attacked.

Once you've deployed Ziti into the Kubernetes cluster you're not done there. Now you can also use Ziti to span cloud networks. You can use it to easily link private data centers or other private Kubernetes clusters all into one secure, zero-trust overlay network! Use Ziti to expose workloads that are TRULY private! In future articles we might explore how we can bring Ziti to bear on these topics, stay tuned!