Set Up a Secure Multiplayer Minecraft Server

Many kids love Minecraft for many different reasons. There comes a point in most users' lives where they decide they want to host their own Minecraft server allowing them and their friends to play on their own private server. It's kind of a big deal for some, it's like owning your own little world where you and your friends can collaboratively search for hidden caves or build giant pyramids with mazes of halls and tunnels.
If these aspiring server hosters get ambitious enough, they'll figure out a way to make it work. Take my son for example; walking by him one day he says "Hey dad, I've hosted my own Minecraft server" to which I replied "Cool, are you playing a LAN party with your brother or something?" (a LAN party is a term for when you play with a group of friends on a local network, like your home wifi). He then replied, "Yeah, I'm playing with Brett and Xavier." After a short pause to process this information I say "Why isn't Brett down here playing with you?" (Brett is his friend after all). My son replies "Brett's at home, I sent him a program that lets him connect to my server."

"You did what now?"
My son had sent his friend an invite via a VPN program, this allowed his friend to connect to our local network so he could connect as if he were sitting right here in our home. This is a security risk, even being one of my son's friends, it means someone could gain access to my network if they manage to obtain the friend's credentials or his computer.
I told him we would need to quickly remedy that situation as I was not comfortable with it. So, we decided to work together and build a zero trust overlay network so he can more securely play with friends. One key difference with the zero trust approach is, it will allow outside users to access my network but I can restrict what they can access. In this case, I'm going to only allow access to the Minecraft server so, users won't be able to access anything else on the machine and definitely won't have access to any other devices on my network. And hey, with zero trust I'm even comfortable letting him invite online friends (the ones he's never met in person).
The Current Network
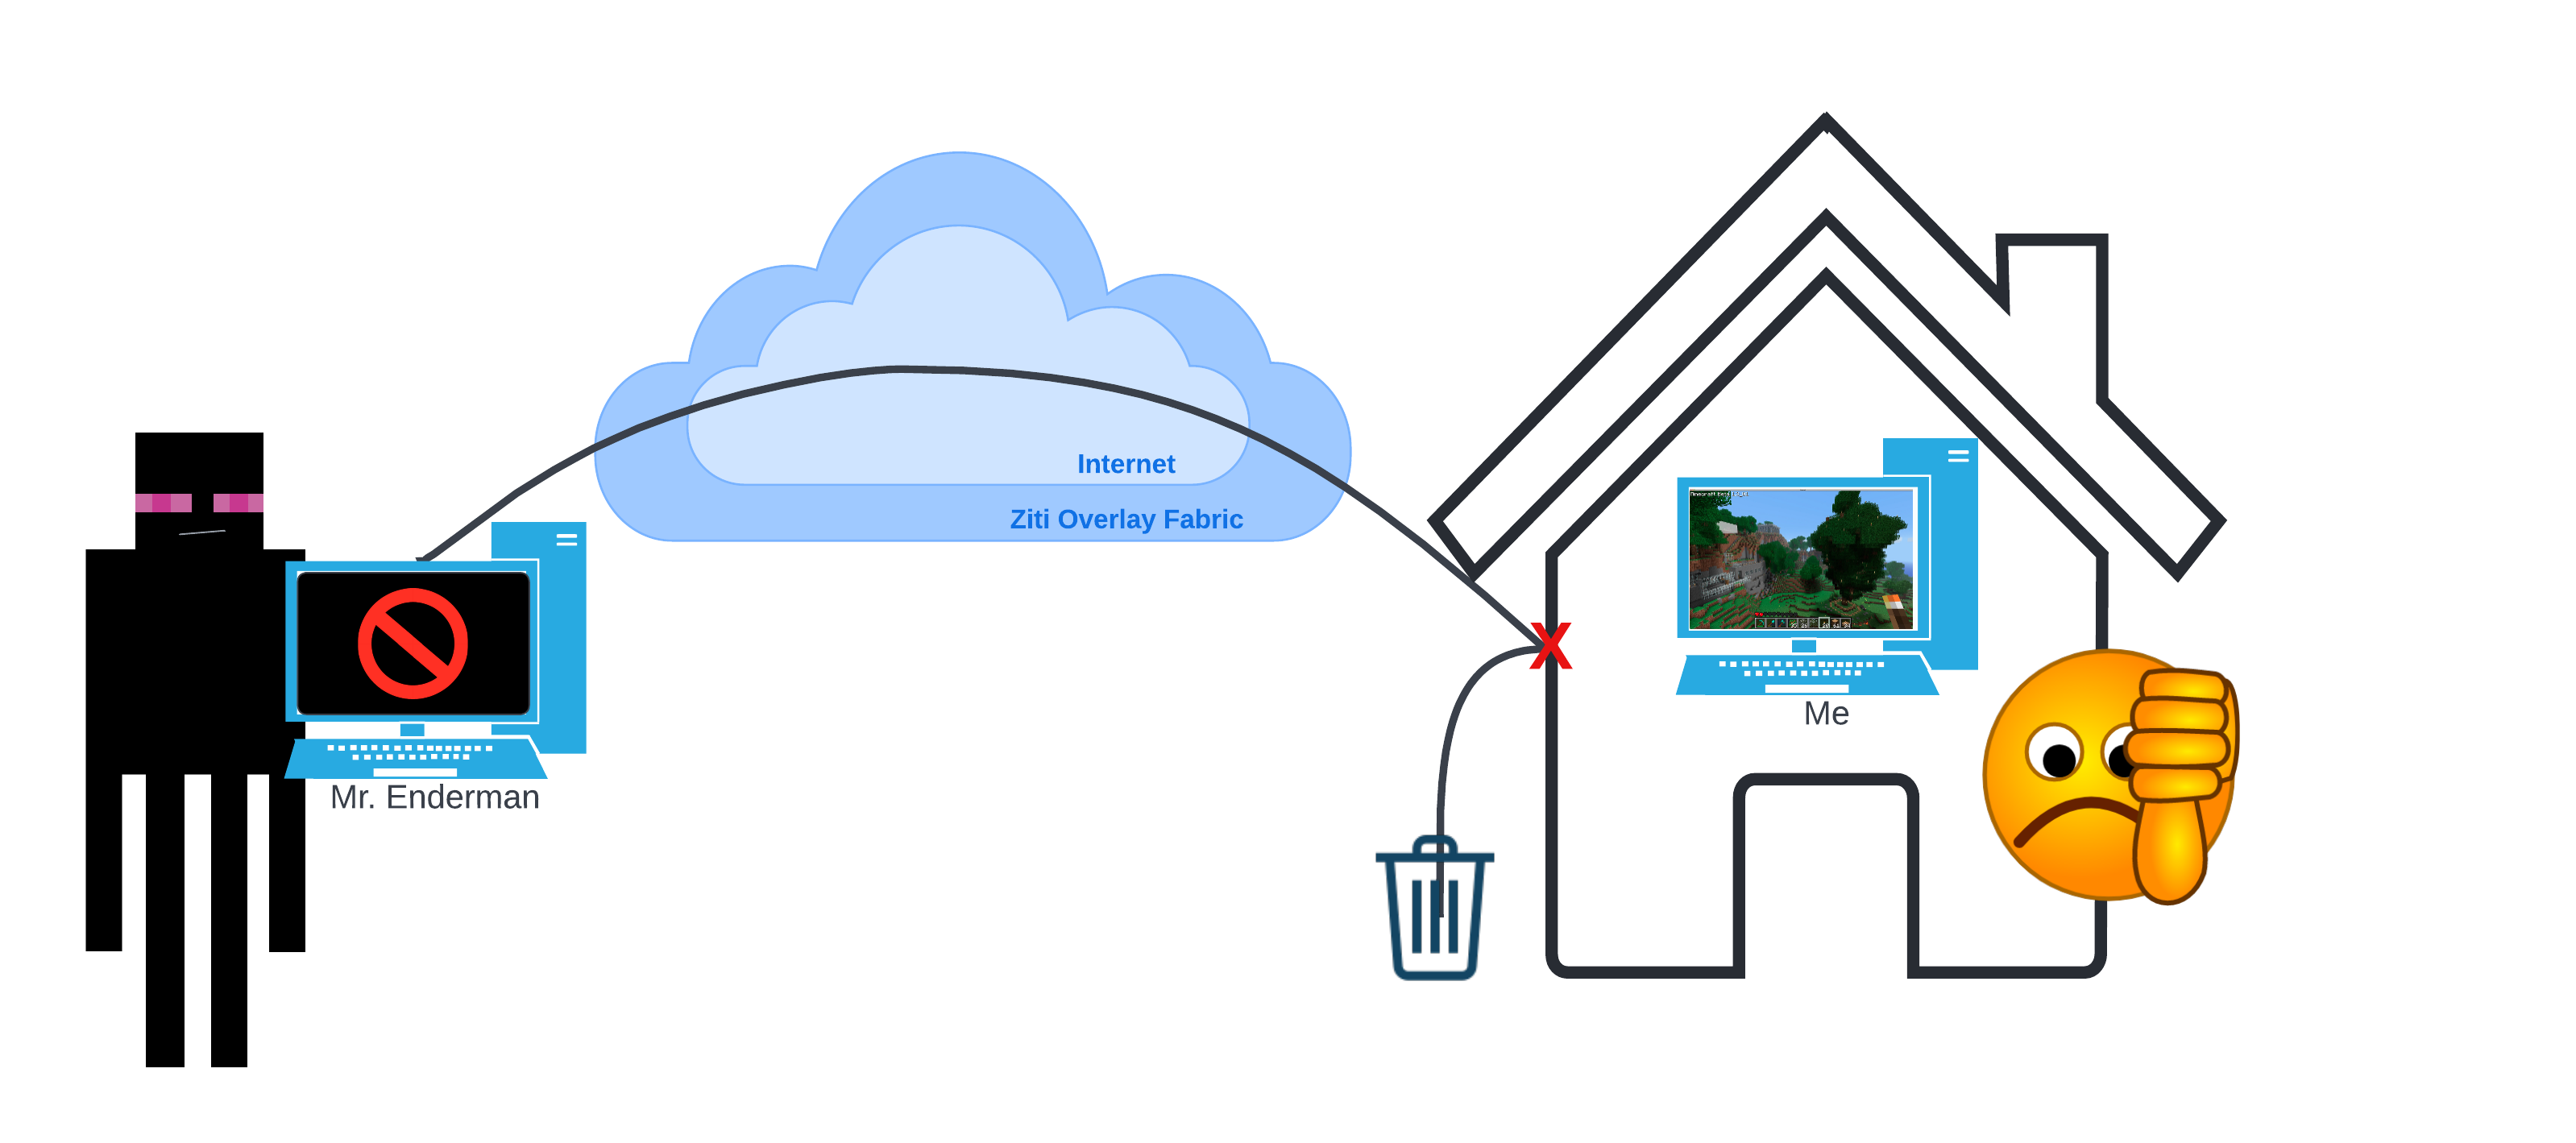
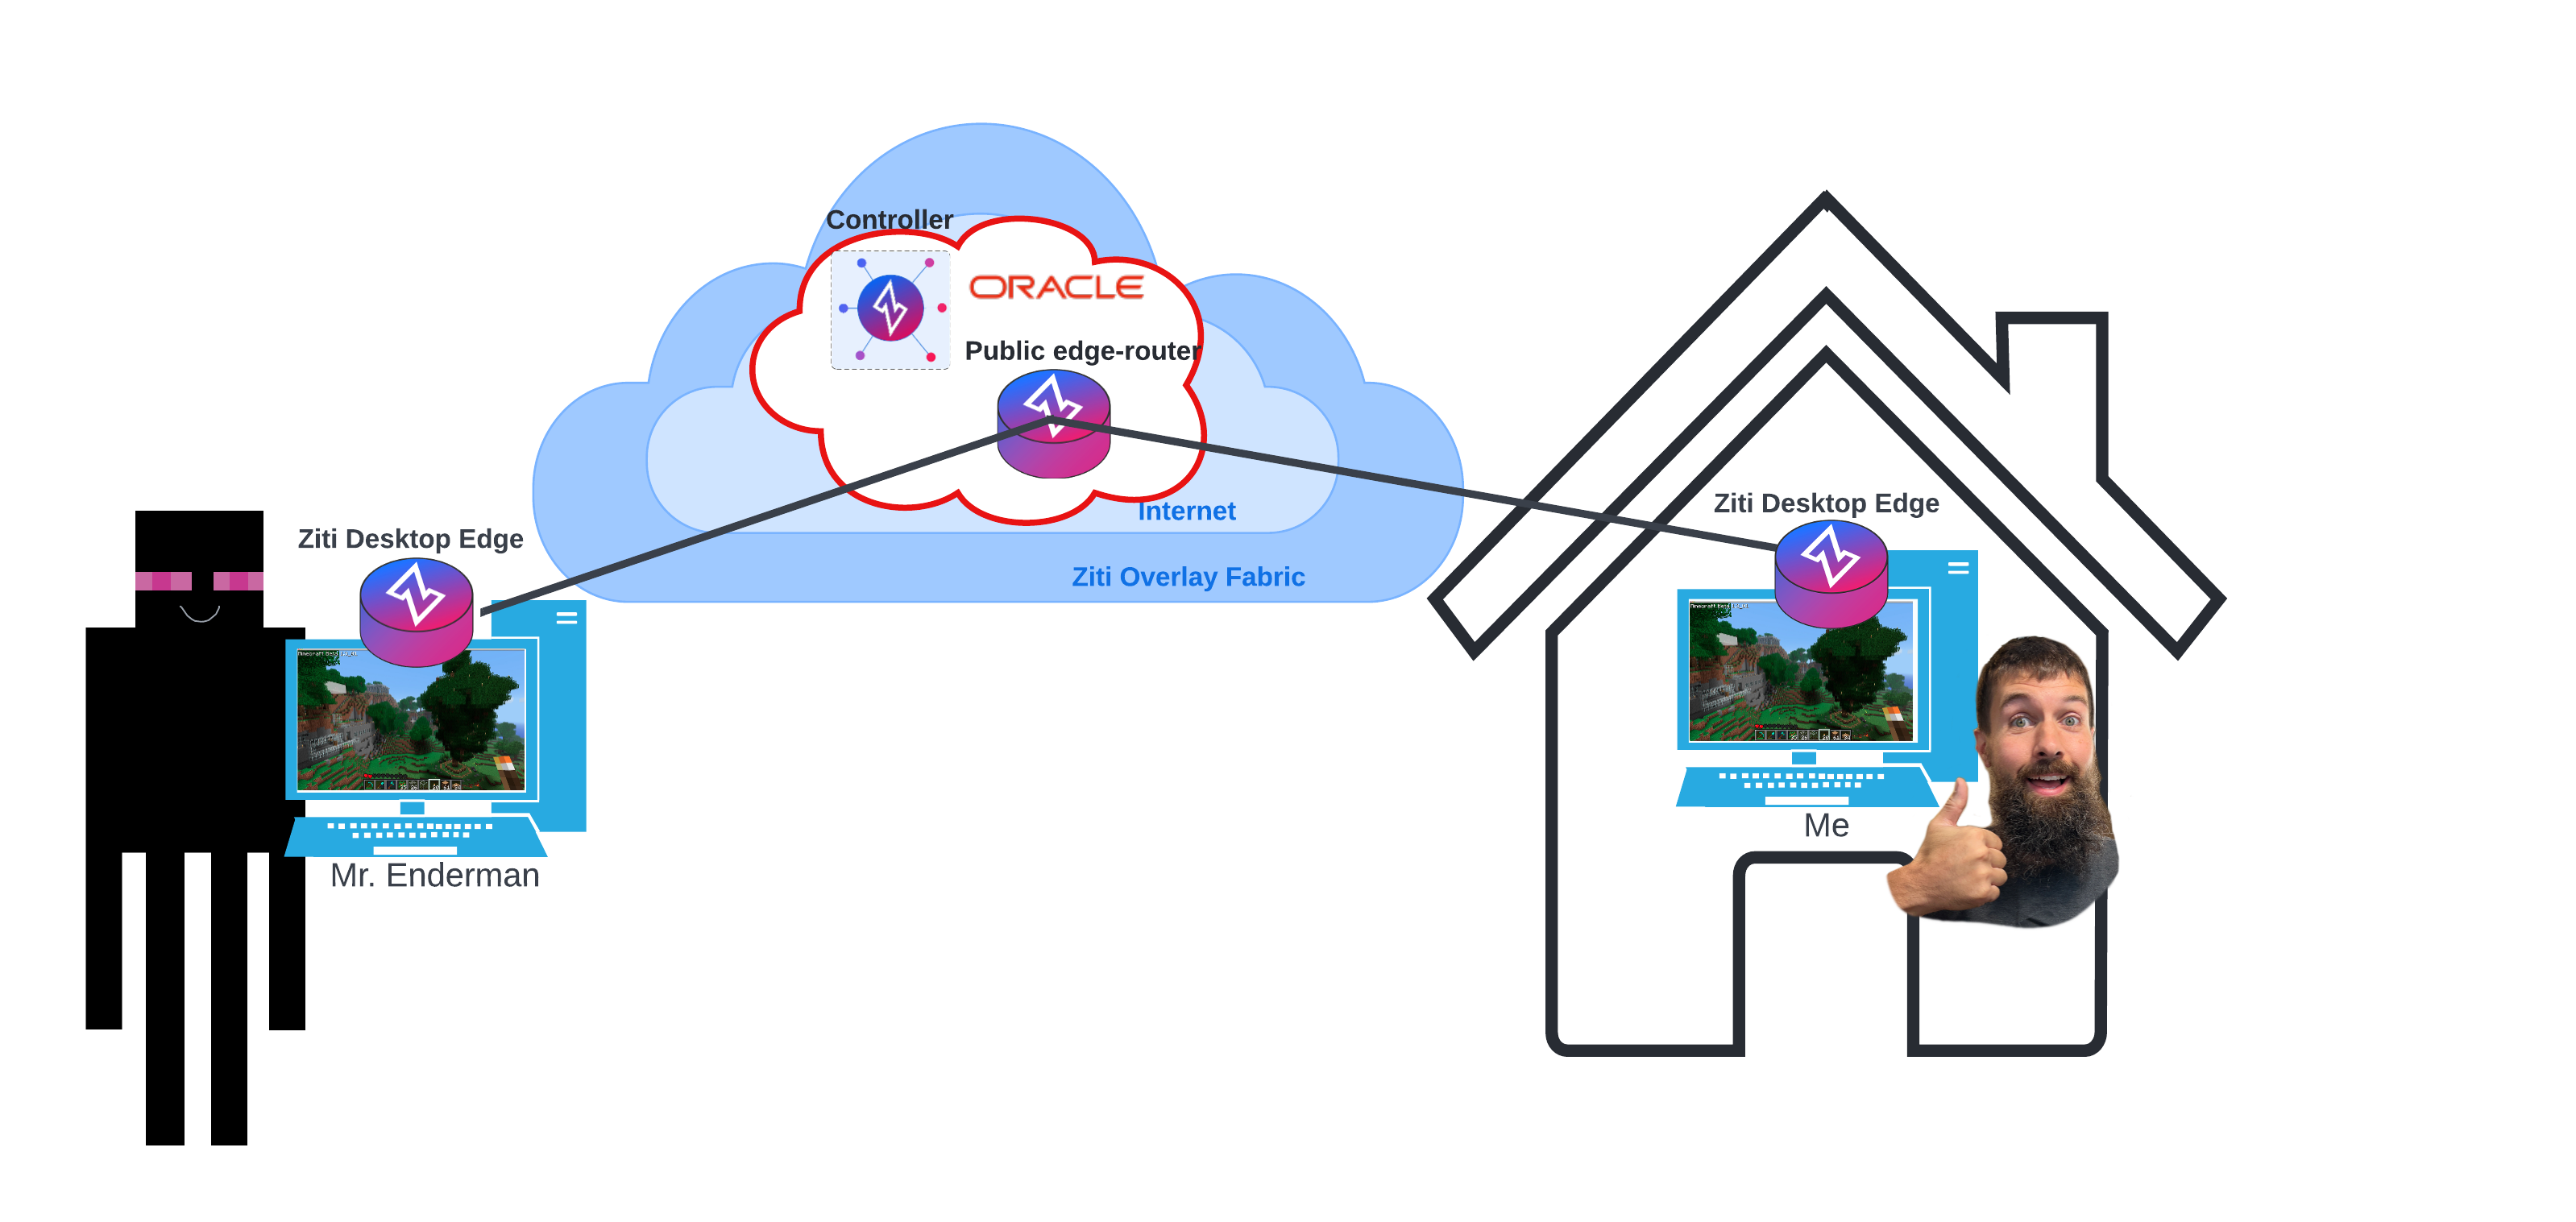
The way the network is right now, there is no way for people outside of the home network to reach the Minecraft server because it's not exposed to the internet. There are a number of ways to give someone access, such as opening the port on your firewall allowing anyone in, using VPN allowing anyone with permission in, a zero trust network allowing anyone with permission in. Though, in the case of zero trust, only those with permission can access Minecraft, they can't access any other device or service provided inside my home network. Here's a simple image to illustrate the network as is, Mr. Enderman wants to connect to my local Minecraft instance but my firewall is blocking the connection.
Getting Started
For starters, you're going to need to set up a virtual private server (VPS) to host the zero trust overlay network. I set mine up through Oracle since it's totally free, you can set up the same by checking out this how-to article. If you're curious why you need a VPS, you don't technically need one. The OpenZiti network could be hosted on your own computer however, there needs to be a way for users to reach that network from the internet and the only way to do that (if your hosting the network) is to expose those precious firewall ports so it's the same scenario as exposing your Minecraft server to the internet. By instead using a VPS, anyone can access the network, with proper authorization of course, then all traffic is sent to your local computer over ports that are already open for you to be able to access the internet.
Some Setup to Simplify the Process
There is a bit of repetitive naming going on throughout the process of configuring the network so here is a list of values that you can change to whatever you want so you can simply copy and paste the network configuration commands and they will adjust based on your values here.
export DEVICE_NAME="my.minecraft.server"
export MY_NAME="my.name.here"
export PORT=25565
For example, in the screen captures going forward, you'll see what would result from using the following values which I used

Configuring the Network
The hardest part is getting the network up and running, once you do that it's simply a matter of a few configurations and you'll be good to go.
Create Identities
Identities are what identify users and devices that you want to connect to something over the network. At a minimum, you'll need an identity for the computer that will be running your Minecraft server. In addition, you'll need an identity for any person who you want to connect to your server. Technically you normally only need identities for people outside your local network but for the sake of simplicity and security we'll give an identity to everyone regardless of their location.
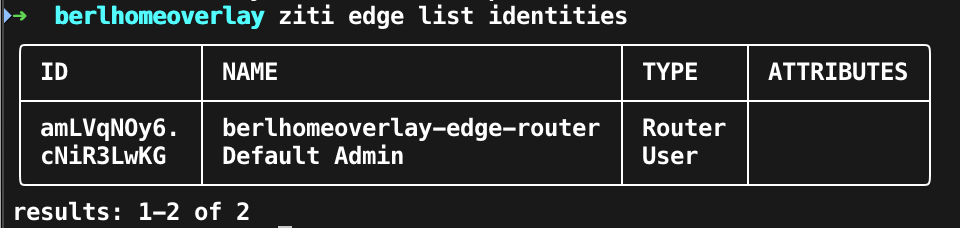
To see the list of identities use ziti edge list identities, here is an example of my before output.
Create an Identity for the Host
Create an identity for the device that will host the server.
ziti edge create identity device ${DEVICE_NAME} -o ${DEVICE_NAME}.jwt -a "${DEVICE_NAME}.hosts"
Create an Identity for Yourself
Create an identity to represent you and later allow you to give yourself access to the server.
ziti edge create identity user ${MY_NAME} -o ${MY_NAME}.jwt -a "${DEVICE_NAME}.clients"
Example Output
You should see two new identities, here's another screenshot showing my output afterward.
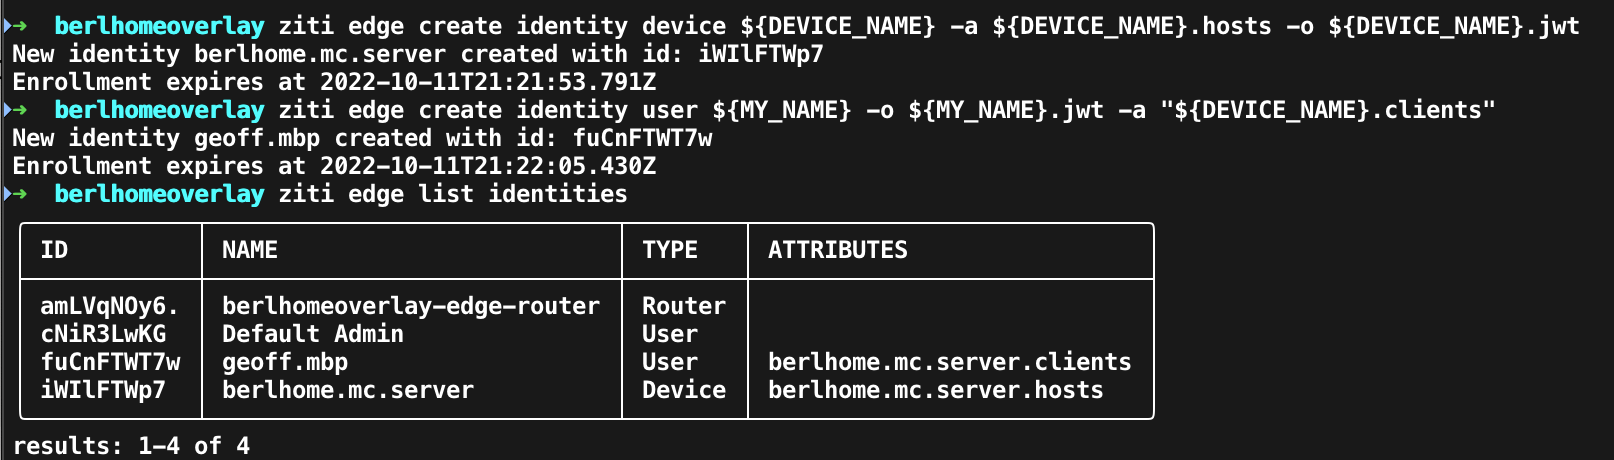
You should also see two new files in your current working directory with the extension jwt. These are Java Web Tokens and are used to authenticate identity enrollment. Keep these output files handy, we'll need them in order to enroll and get access to the server. They have a timeout for security purposes but the default timeout will give plenty of time for enrollment before expiring.

Create a Service and Configurations
Without getting into too much confusing jargon, a service is essentially how you connect your overlay network (the zero trust OpenZiti network) to the underlay (your home network).
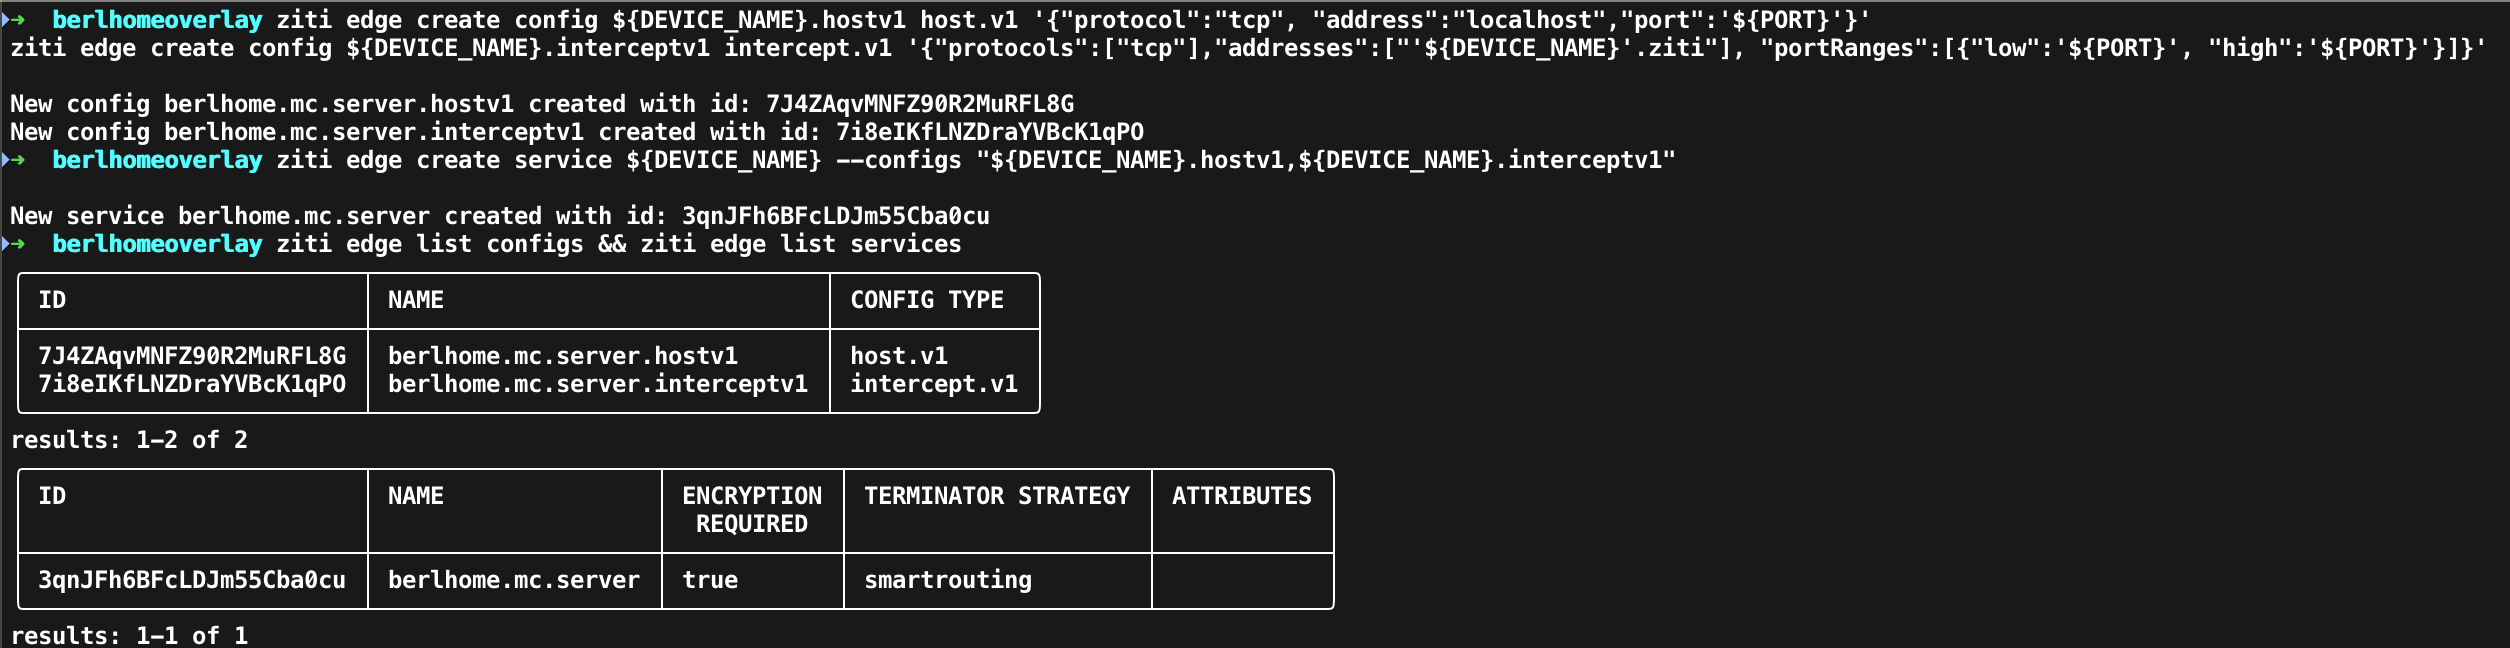
I won't bother showing output for the following commands as it's just an empty list. To see service configurations and services use ziti edge list configs and ziti edge list services respectively.
Service Configurations
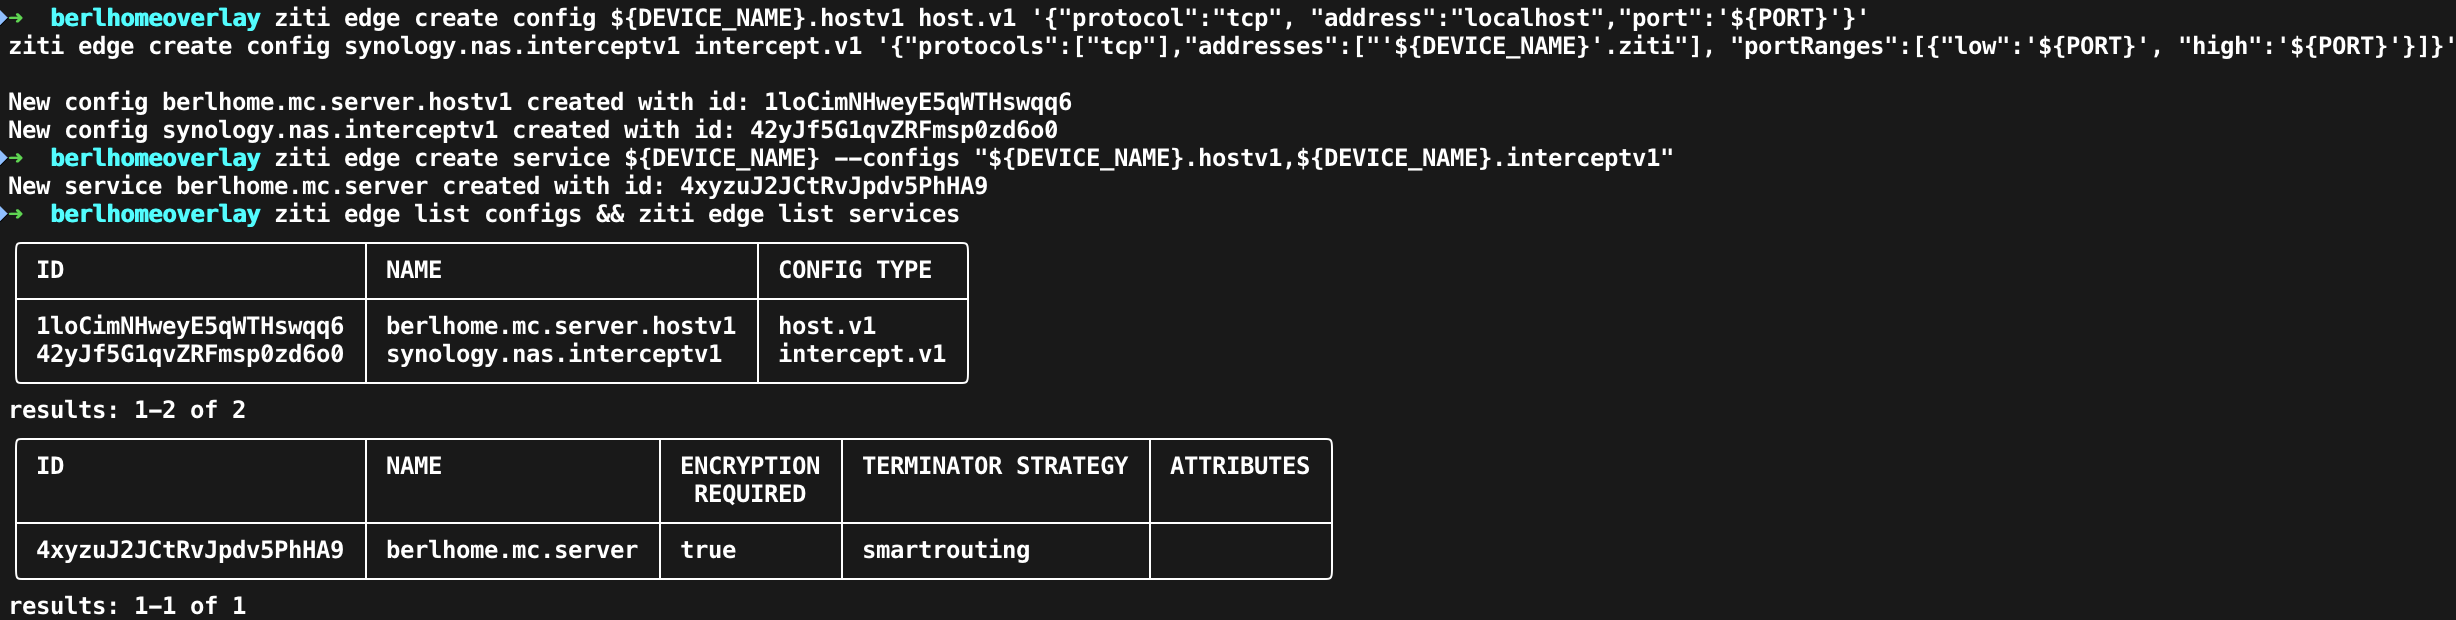
ziti edge create config ${DEVICE_NAME}.hostv1 host.v1 '{"protocol":"tcp", "address":"localhost","port":'${PORT}'}'
ziti edge create config ${DEVICE_NAME}.interceptv1 intercept.v1 '{"protocols":["tcp"],"addresses":["'${DEVICE_NAME}'.ziti"], "portRanges":[{"low":'${PORT}', "high":'${PORT}'}]}'
Service
ziti edge create service ${DEVICE_NAME} --configs "${DEVICE_NAME}.hostv1,${DEVICE_NAME}.interceptv1"
Example Output
Create the Service Policies
The service policies define who will have access to a given service. Here we'll give access to the server so it may host the service. We will also give access to a "group" to be able to connect to the server. By creating a policy granting access based on an 'attribute', we can simply give this attribute to any identities we want to give access to. Otherwise, you'd need to create a service policy for every user.
ziti edge create service-policy "${DEVICE_NAME}.bind" Bind --service-roles "@${DEVICE_NAME}" --identity-roles "#${DEVICE_NAME}.hosts"
ziti edge create service-policy "${DEVICE_NAME}.dial" Dial --service-roles "@${DEVICE_NAME}" --identity-roles "#${DEVICE_NAME}.clients"
Example Output
Enroll the Identities
Now we need the jwt files created earlier. First, you'll want to download the Ziti Desktop Edge for the appropriate operating system you have.
Windows
Currently, only Windows 9 and later are supported. If you are running an older version of Windows and want support for it, let us know in the comments. Ziti Desktop Edge for Windows (ZDEW)
Mac
Linux
There is a Ziti Desktop Edge in the works for Linux, in order to set up a host using Linux you would need to use the Ziti Tunneler SDK which can be found here. The setup is a little different so that will be saved for another article. In the meantime you can certainly try it yourself, there are lots of helpful people on the OpenZiti Discourse Forum so if you run into problems, you can get some help there.
Enroll the Host Device
You'll want the enrollment token named with the value you entered for DEVICE_NAME to be used on your device hosting the server.
Open your Ziti Desktop Edge app and click the plus button to "Add an Identity". Navigate to your enrollment token and select it. Once it's been added you will see an "Enroll" button, click that and that's it!
Enroll Yourself
The other jwt should be named with the value of MY_NAME and this will be used on the device you will be using to connect to your server. It's quite possible that this is the same computer as the one hosting the server. The process is the same in either case.
Again, open the Ziti Desktop Edge app, click the "Add an Identity" button, click "Enroll" and you're ready to test your zero trust network.
The New Network
Now that we've configured all of this, I'll revisit that image of the network from before. Only now, we can see that through the use of ziti desktop edge, and our hosted zero trust overlay network Mr. Enderman would have access to play on my server (assuming I gave him a token with the right attribute).
Testing Your Zero Trust Minecraft Server
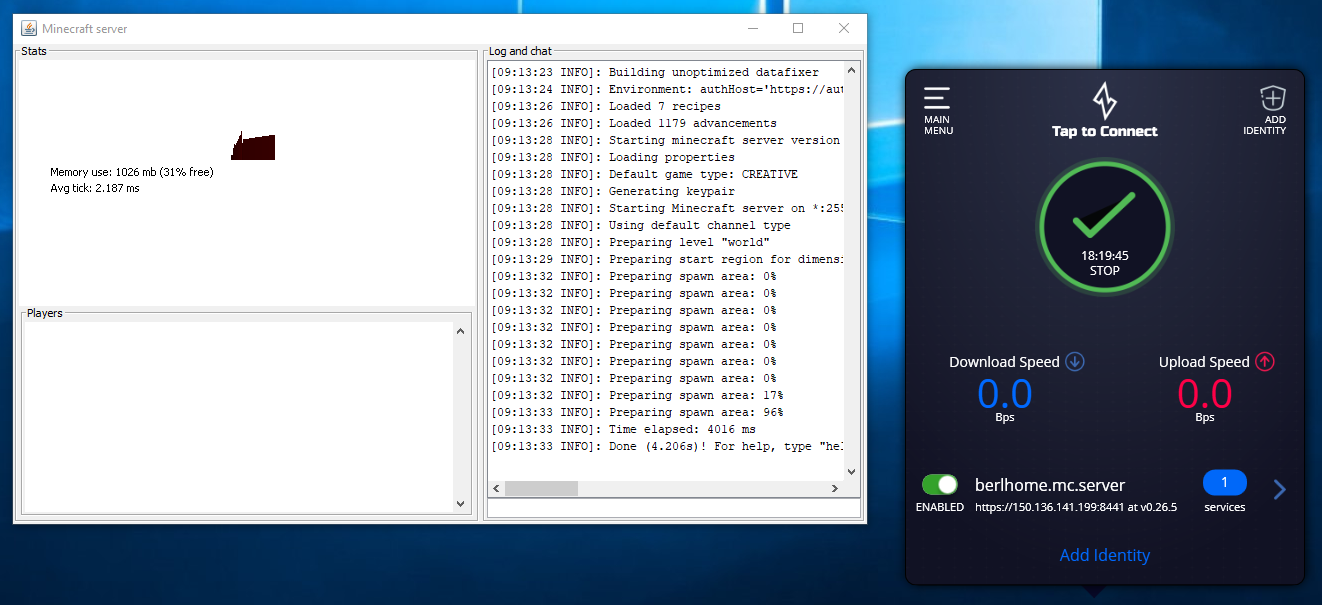
After that hopefully short and simple configuration process, we should be able to connect over the overlay network.
Ensure your Minecraft server is running on the host machine. Connect to the host machine using the new ziti service address. Obviously, we need to also be sure that our Ziti Desktop Edge application is running on each machine.
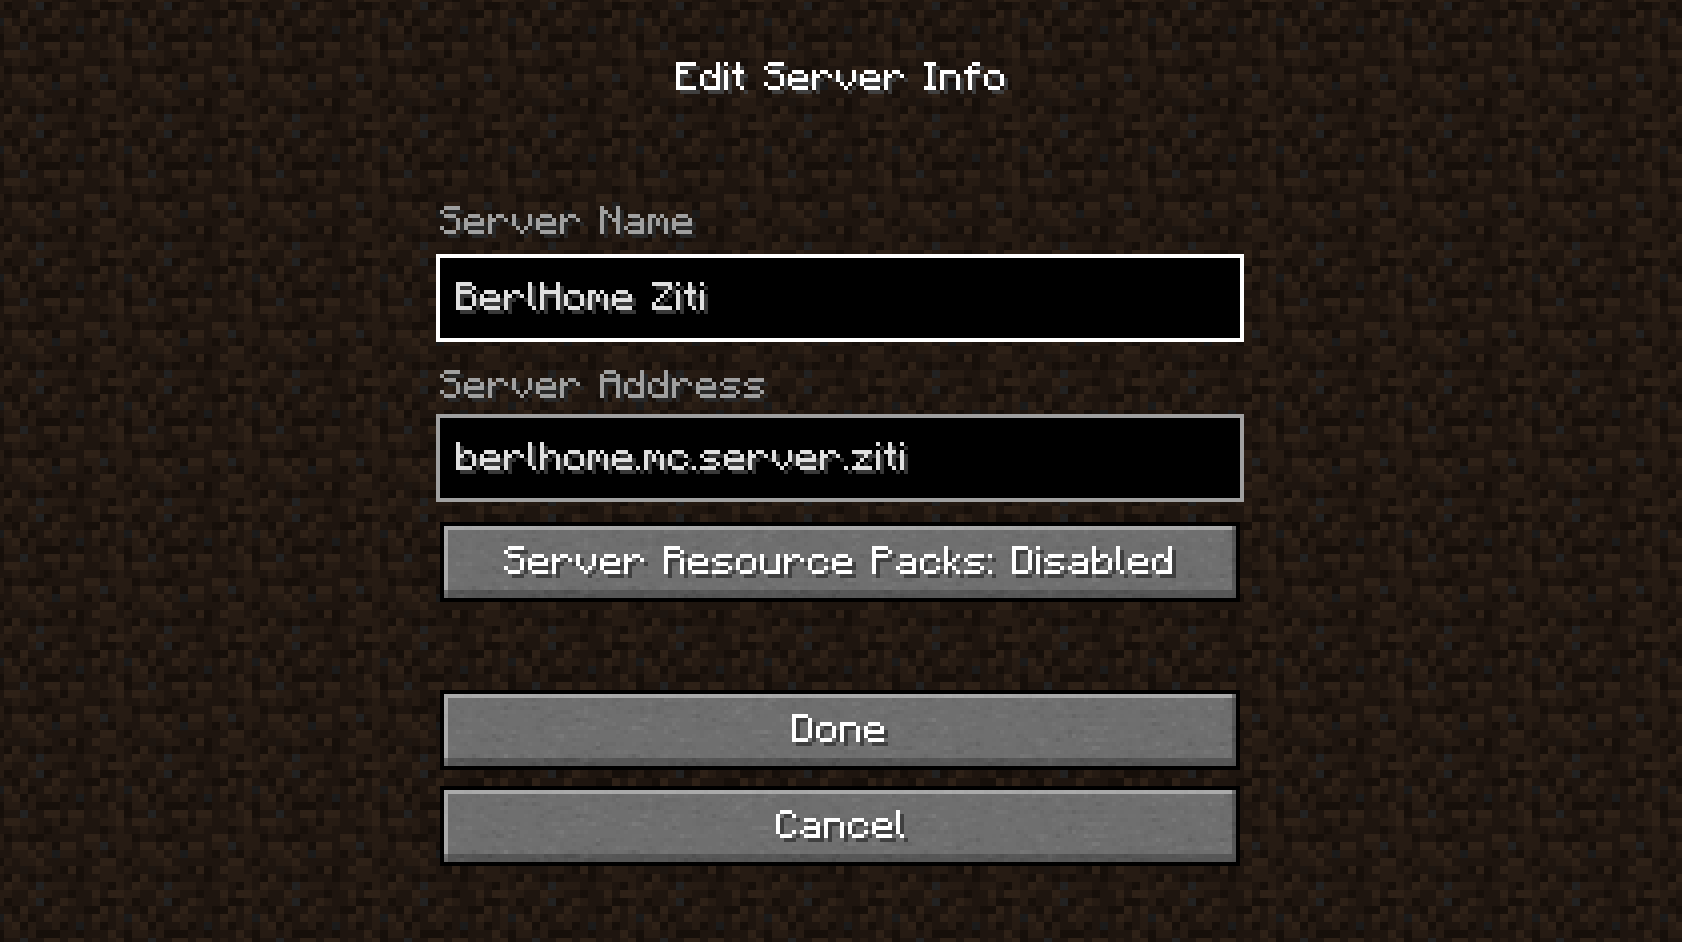
Select multiplayer and enter your server address. The server address will be the value you put in DEVICE_NAME plus ".ziti". For example, in my case, I had "berlhome.mc.server" as the DEVICE_NAME so my address is berlhome.mc.server.ziti.
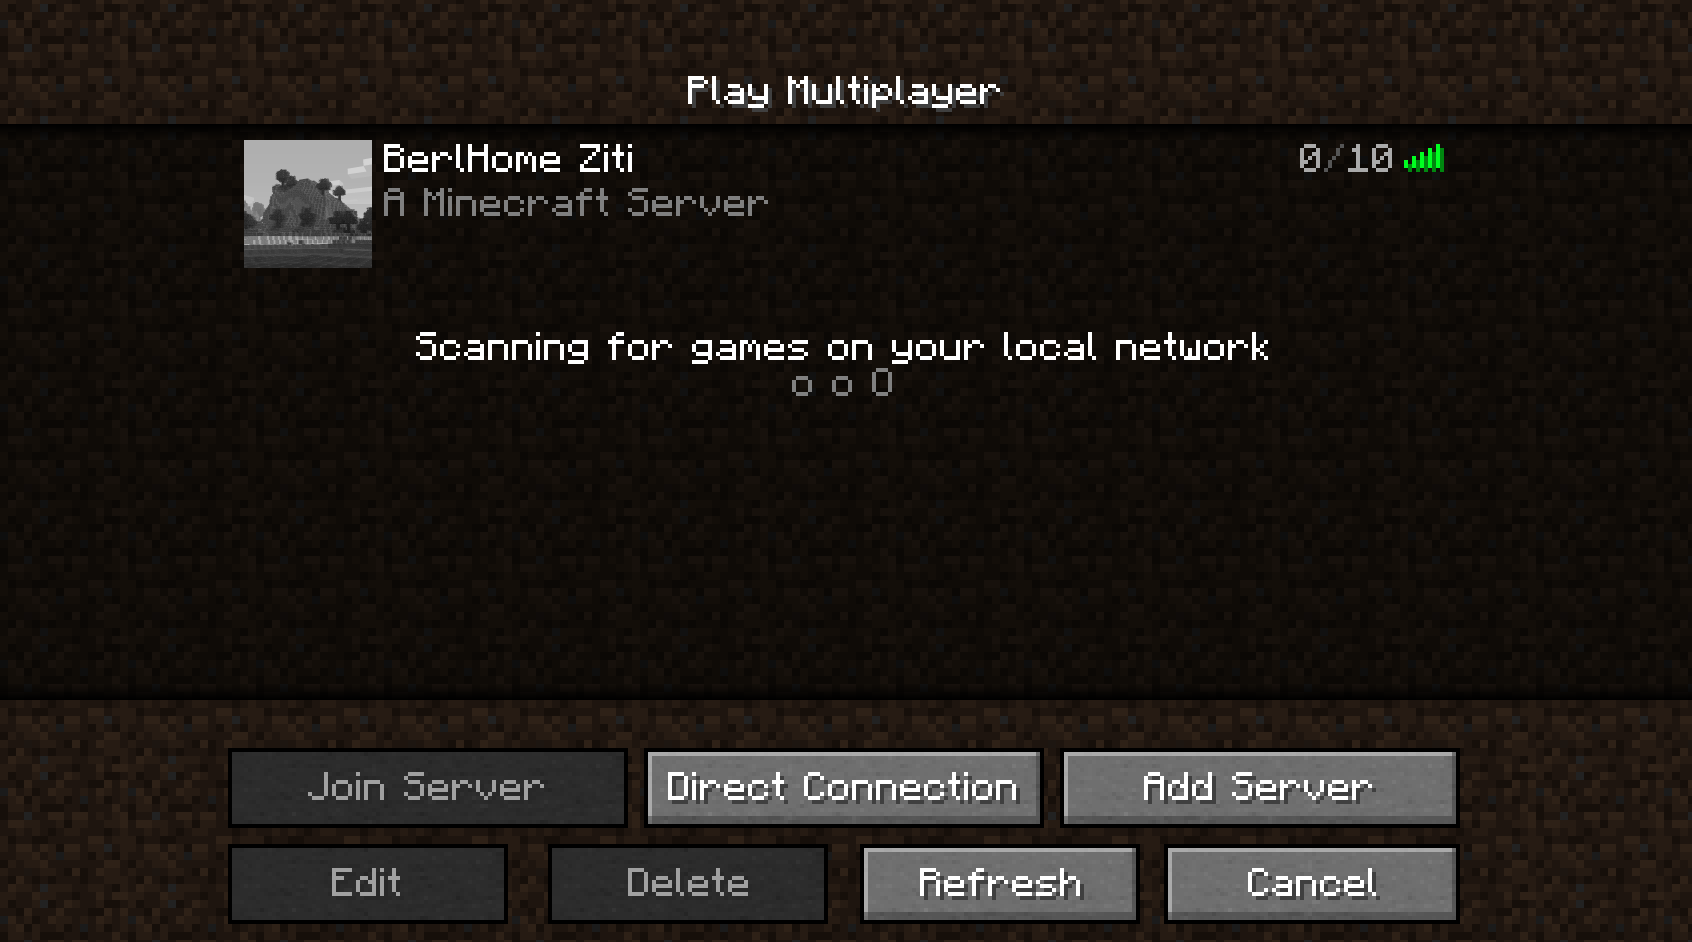
Now backing out to the multiplayer menu again, I can see that the server is online, exciting!
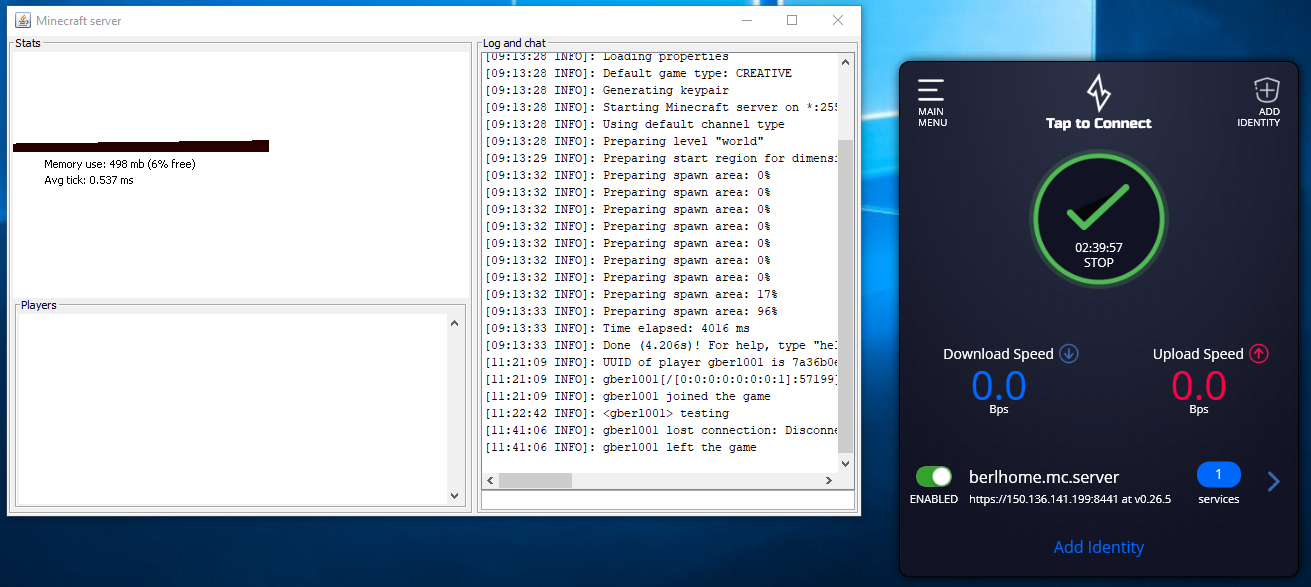
Here's a little proof I was able to connect, I only played for about 20 minutes but it works great. Now, if I want to invite friends I just ask them to download the Ziti Desktop Edge, create an identity token for them, making sure they have the attribute #${DEVICE_NAME}.clients so they are authorized, and send it their way. At any time I can issue a new one or revoke permissions.