Setting Up Oracle Cloud To Host OpenZiti

For a long time, I've been concerned about relying on a company's focus on security. I generally expect the least focus on security as many companies just want to be first to market. Yikes, that sounds bad, but many companies indeed focus too little on security. I do not expose my internal network to the world by opening ports on my firewall. While I'd like access to a few things like my security camera system, network storage device, home assistant, etc., I am very concerned that some bad actor will somehow find my hosted service and find a way in because of some CVE that hasn't been patched. Now that I've drawn a severely dark picture let's bring some light in, haha.
I started working for a company called NetFoundry, which develops an open source project, OpenZiti. The product is a zero trust network overlay that allows you private and secure access to your hosted services without having to add firewall rules to allow traffic on specific ports/addresses. Hosting my own network requires a virtual private server; as you may know, many different options are available. I ultimately settled on Oracle's Cloud Infrastructure because they have a free tier like many other cloud providers. Oracle's free tier is different. However, their free tier won't allow you to accidentally use paid services if you don't upgrade your account to a paid account. You can host up to two instances totally free, and there's no expiration where you'll have to pay for services going forward. Read on to see how I set up my OpenZiti zero trust network on Oracle's Cloud Infrastructure.
Creating an Instance
The signup page is inundated with mentions of their free account offerings, so signing up should be easy.
On the left sidebar, you should see an "instances" option; go ahead a select that. This will bring you to a dashboard showing you any current instances, and you should see a "Create instance" button.
Name and Compartment
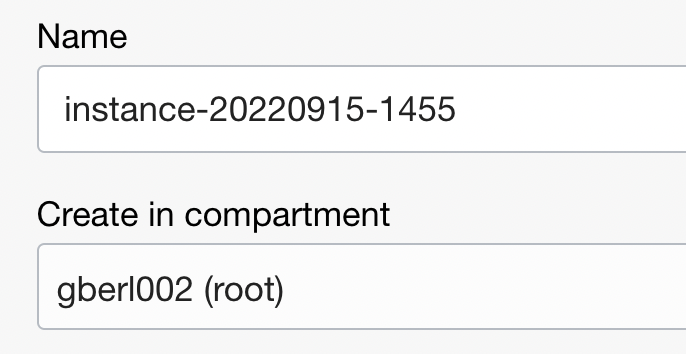
Name
That name is hideous, so feel free to change that; I called mine BerlHomeOverlay. My dad came up with the BerlHome moniker for his home WiFi, and it's stuck with me, so I prepend Berl to many of my devices and services.
Compartment
Without going into too much detail, compartments allow you to organize your resources, but since we're covering the free version, which only hosts two instances at max, I will skip over this and leave the default.
Image and Shape

I've skipped over"placement" for brevity and accepted the defaults; it allows you to specifically choose an availability domain.
Image
The default is Oracle Linux 8, but I'd rather not deal with the differences that might occur in their instance over a standard Canonical Ubuntu release, so I've changed mine to Canonical Ubuntu 22.04 though there are other OS options and versions that fall into the "always free-eligible" tier, so it's worth checking out.
Shape
The shape defines the characteristics of your virtual machine, such as how much memory and CPU power. Options are pretty limited here if you're using the always free options, so your likely option is just to leave this one the default.
- Oh, and ignore that warning "Service limit will be reached..." it's just saying that because I already have an instance. I'm only allowed two instances, so creating this instance will meet my service limit.
Networking

As with many cloud service providers, the networking bit is pretty much automatic. The nice thing about Oracle's (that I've noticed) is that it uses your existing virtual network and subnet if you've already created these services from another project. You can also define whether or not you want a publicly accessible IP address which we do, so leave that the default.
SSH Keys
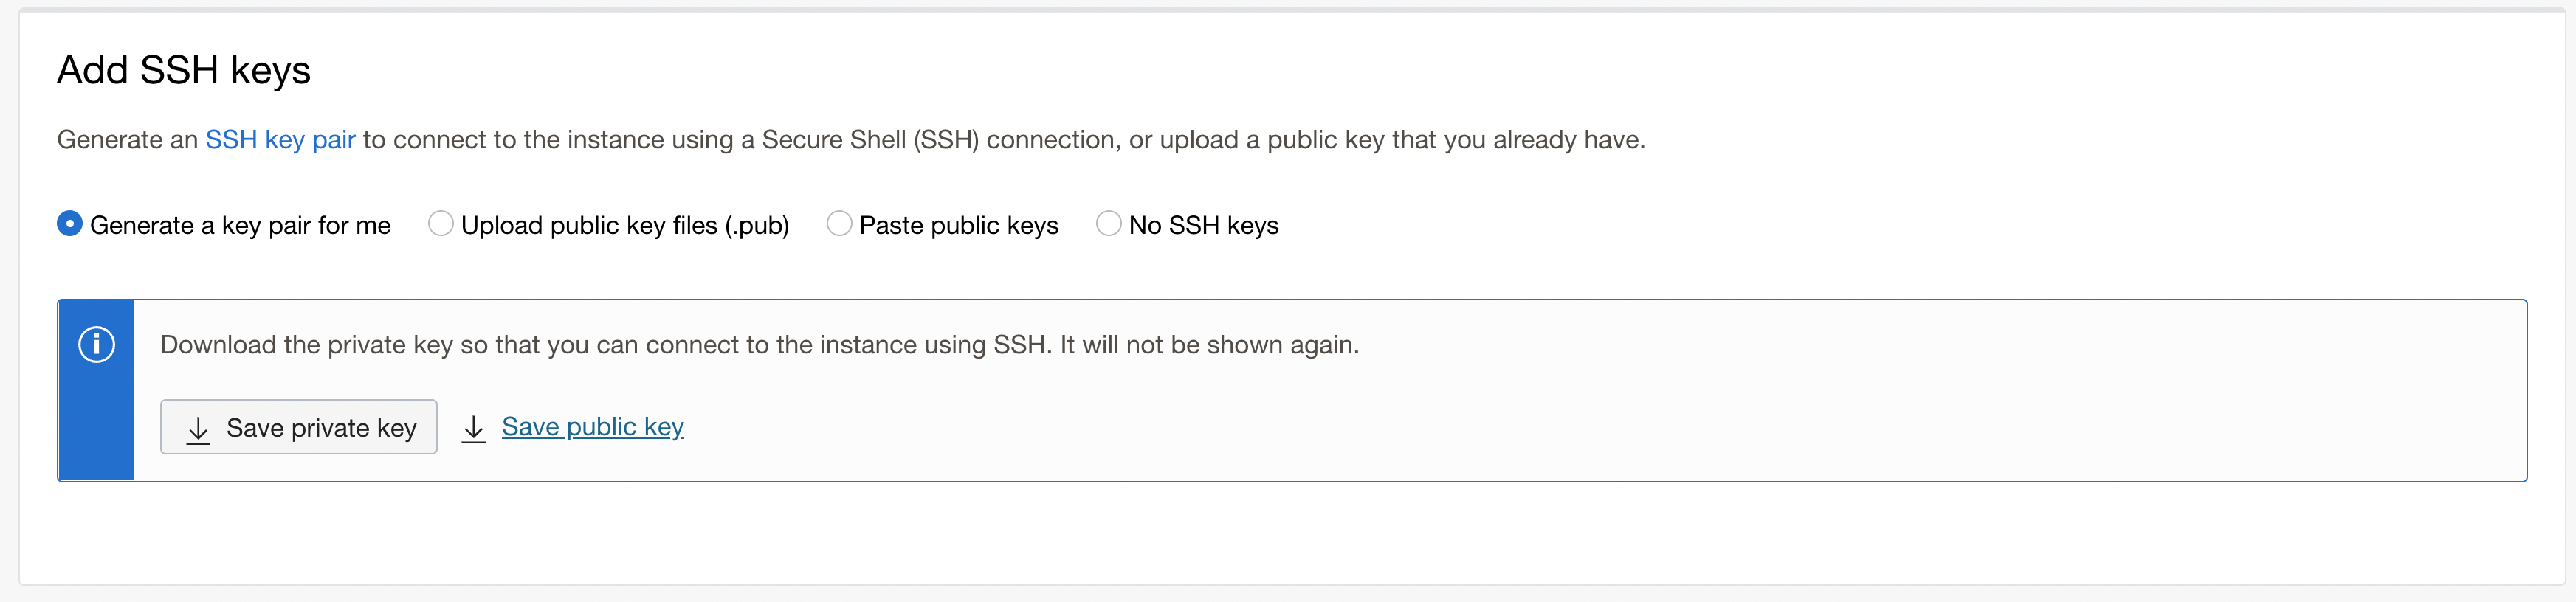
I want an SSH key, so I can SSH into my machine. If you already have an SSH key set up for something else, you can use an existing SSH key by pasting or uploading the public key.
Boot volume
I'm skipping this section as I don't want to specify any particular criteria for the boot volume, I'll just accept the defaults.
Edit the Security List
After giving the instance a few minutes to boot up, we should edit the Security List. By default, as of this writing, Oracle automatically creates four rules. One of those rules is for SSH access. The Security List allows all IPs access to the SSH port 22. This is a security risk, and I recommend editing this rule to include only your IP.
To find your public IP, you can Google search "what's my IP" or use curl eth0.me if you're on a *nix machine.
Here are the steps to edit that setting:
On the instance page, under instance details, click the virtual cloud network link (should start with "vcn")
On the VCN page, in the left sidebar, select Security Lists
You should only see one security list in the table; click that
Click the three-dot menu button on the right for the rule that has a "Destination Port Range" of 22 and select Edit
Paste your public IP address into the Source CIDR field and add
/32. It should look like this12.34.5.67/32Save and you're all done. Hit the back button or use the breadcrumb menu to go back to your VCN
Adding Security List Rules
Now we need to configure network traffic to and from the instance by adding some rules to the Security List. Click the "Add Ingress Rules" button and read on.
Ingress Rules
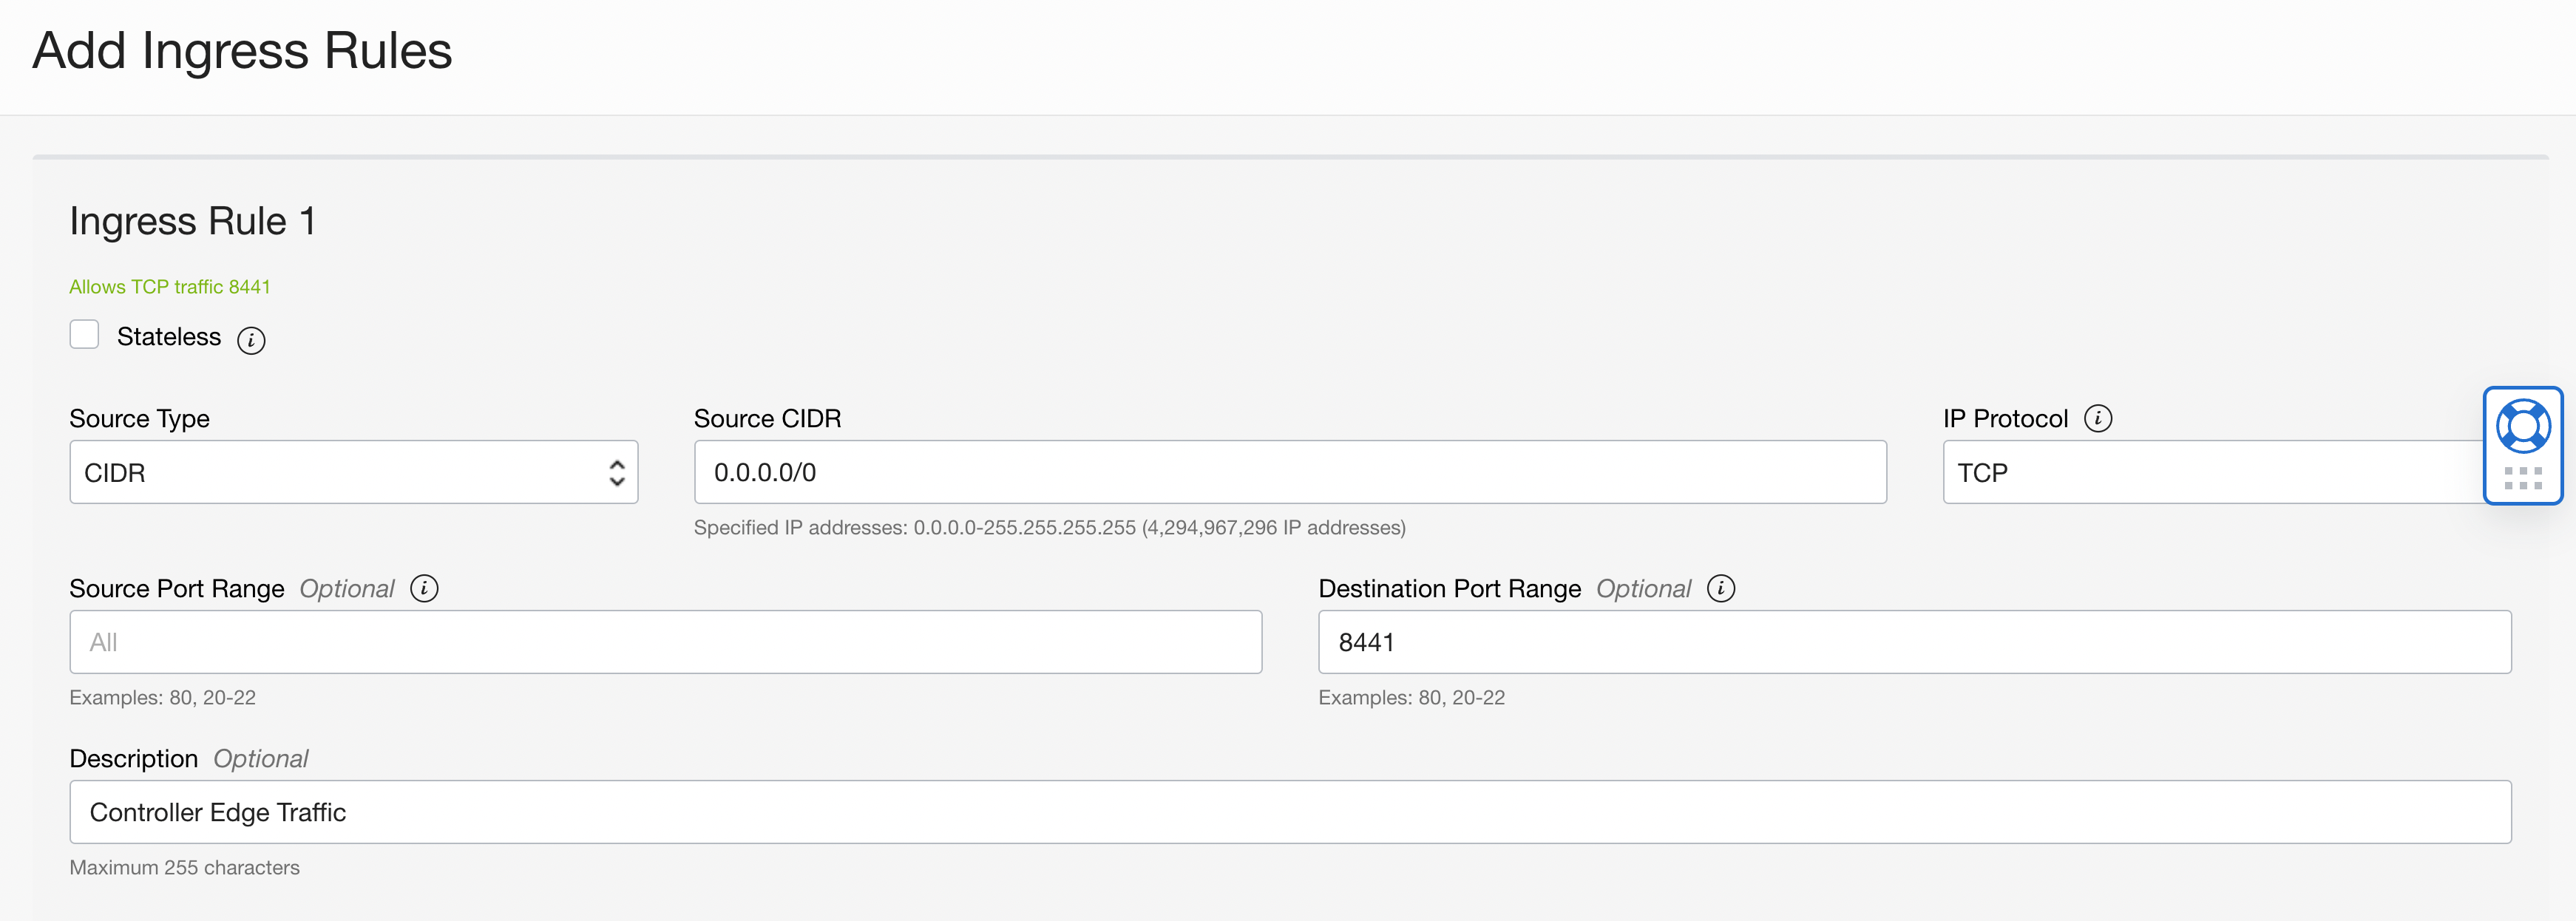
Here is the first ingress rule we need.
Source Type: CIDR
Source CIDR: 0.0.0.0/0 (all traffic)
IP Protocol: TCP
Source Port Range: Leave Blank!
Destination Port Range: 8441
Description: Controller Edge Traffic
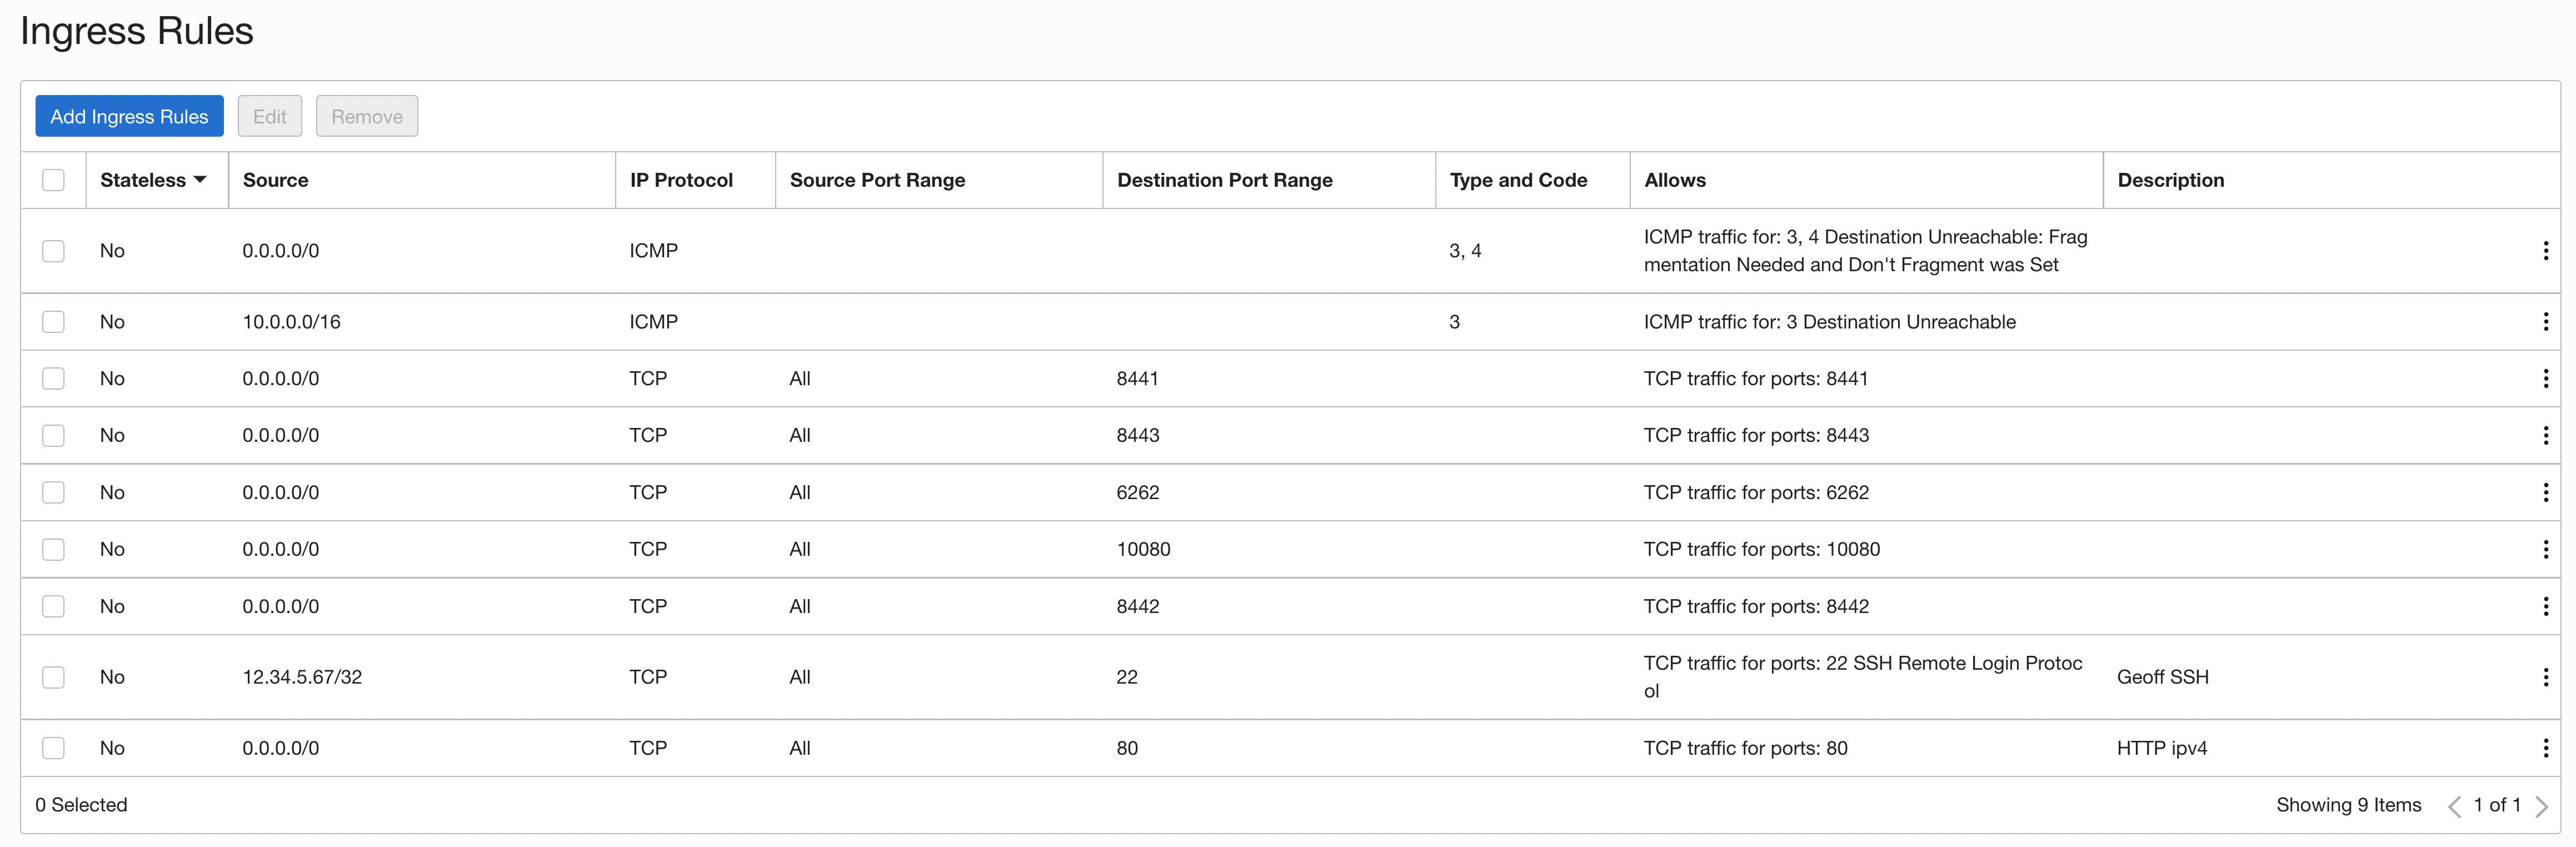
This process needs to be repeated for the remaining ports required for my overlay network; here are the remaining ports:
8442 - The Edge Router port
8443 - (optional) Ziti Admin Console (for GUI interface)
EDIT: As of November 2022, use port 8440
6262- For Router to Controller communication10080 - For Router to Router communication
The following fields are the same for all ports.
Source Type: CIDR
Source CIDR: 0.0.0.0/0 (all traffic)
IP Protocol: TCP
Source Port Range: Leave Blank!
Egress Rules
I want to allow all outbound traffic. The security list already contains a rule with the following information, so that's all set.
Destination Type: CIDR
Destination CIDR: 0.0.0.0/0 (all traffic)
IP Protocol: All Protocols
Source Port Range: Leave Blank!
Destination Port Range: Leave Blank
Here are all of the inbound rules
Installing the Ziti Network Overlay
At this point, we're ready to set up the beginnings of our network. With the Express Install feature, we'll quickly and easily create a controller and edge-router, a PKI, and a slew of useful commands.
SSH Into the Instance
Simply use the following command to SSH into the instance from your home computer. Replace the key file path and name with the one you downloaded or if you uploaded one, the one you uploaded. Also, change the IP address to the public IP address of your instance.
ssh -i ~/.ssh/id_geoff_berl.key ubuntu@129.159.84.227
Open Ports On The Local Firewall
Another quirk about Oracle instances is that they have a local firewall that needs ingress and egress rules applied, just as we already did in the Oracle web interface. To set the rules on the local firewall:
sudo apt install firewalld -y

sudo firewall-cmd --zone=public --add-port=8440/tcp --permanent
sudo firewall-cmd --zone=public --add-port=8441/tcp --permanent
sudo firewall-cmd --zone=public --add-port=8442/tcp --permanent
sudo firewall-cmd --zone=public --add-port=8443/tcp --permanent
sudo firewall-cmd --zone=public --add-port=10080/tcp --permanent

sudo systemctl restart firewalld
Run Express Install
Now, you'll run the express install. Rather than including those commands here, you can follow the guide here and come back. But WAIT, one thing to note is that Oracle does not provide an external DNS, so when the guide asks you to set that value, use the public IP instead. For the record, I would recommend following the instructions to set up the systemd service so the controller and routers will start up with the instance if it's ever shut down.
Change The Admin Password
UPDATE: The quickstart now allows you to set your password during the express install; if you don't set it, a random password will be generated. At any time, you can find the password in the .env file created during express install, or if your session environment hasn't been cleared, you can use echo "${ZITI_PWD} to display your password in the terminal. If you do wish to change your password, the following section of this article will explain the details involved. Otherwise, if you set your password or want to use the generated password, you scan skip this section.
It is extremely important to change your password from the default as, being a default, it poses a security risk since anyone can log into it providing the default values.
The zitiLogin command is a simplified way to log into the controller. It uses the values from the .env file created during the installation. If at any time you receive an error code UNAUTHORIZED, your session likely timed out, simply run zitiLogin again
zitiLogin
ziti edge update authenticator updb --identity "Default Admin" --password "your_new_password"
Since we updated the password, we'll want to update that value in the .env file that contains pertinent information about your network and is used for logging in with a single command.
Use your favorite bash editor (here, I'm using vi)
vi "/home/ubuntu/.ziti/quickstart/$(hostname -s)/$(hostname -s).env"
Scroll down until you find ZITI_PWD. You'll see it says the value is admin, change that value to whatever your new password is and then re-source the env file to update your environment with the new password.
source "/home/ubuntu/.ziti/quickstart/$(hostname -s)/$(hostname -s).env"
BONUS - Remote Access To Ziti Controller
Suppose you don't want to SSH into the instance whenever you want to access your controller. In that case, you can pull some files down locally, source them and log in from your local computer.
Find your instance's hostname
echo $(hostname -s)(in my case, it's berlhomeoverlay)Copy this value and return to your local machine
I like to create a local folder for the instance-related files, but it's optional, so on my home computer, I run
mkdir berlhomeoverlayandcd berlhomeoverlayinto itCreate an env variable with the previously copied Oracle instance hostname to make things easier export INSTANCE_HOSTNAME="berlhomeoverlay"
Copy the
.envfile from your Oracle instance to your local computer, and be sure to change the identity key and public IP again.
# Copy env file so we can connect to the AWS hosted network from local machine
scp -i ~/.ssh/id_geoff_berl.key ubuntu@129.159.84.227:"~/.ziti/quickstart/${INSTANCE_HOSTNAME}/${INSTANCE_HOSTNAME}.env" .
Remove some of the environment values intended for use on the instance itself and source the file to load the values locally. sed -i '' -e '/ubuntu/d' "./${INSTANCE_HOSTNAME}.env"
Create a
login.shfile with the contents below
#!/bin/bash ziti edge login https://$ZITI_EDGE_CTRL_ADVERTISED_HOST_PORT -u $ZITI_USER -p $ZITI_PWD
Make that login file executable
chmod +x login.shSource the Ziti CLI functions file and download the binaries for use on your local machine.
source /dev/stdin <<< "$(wget -qO- https://raw.githubusercontent.com/openziti/ziti/release-next/quickstart/docker/image/ziti-cli-functions.sh)"; getZiti
- Now, any time you want to log into the controller on the oracle instance, run
# Source the remote instance environment values
source "./${INSTANCE_HOSTNAME}.env"
# Log in
./login.sh
Now What?
Check out my other articles in this series (see series links below) where I add to this network and start adding many of the devices and services I host at home so that I can access them from anywhere. If you're having trouble finding the series articles, start with one of these articles; I Created a Zero Trust Overlay Network to Access HomeAssistant, Free Secure Access to NAS From Anywhere.